Pomegranate, Salted Caramel and White Chocolate Pan Cookie

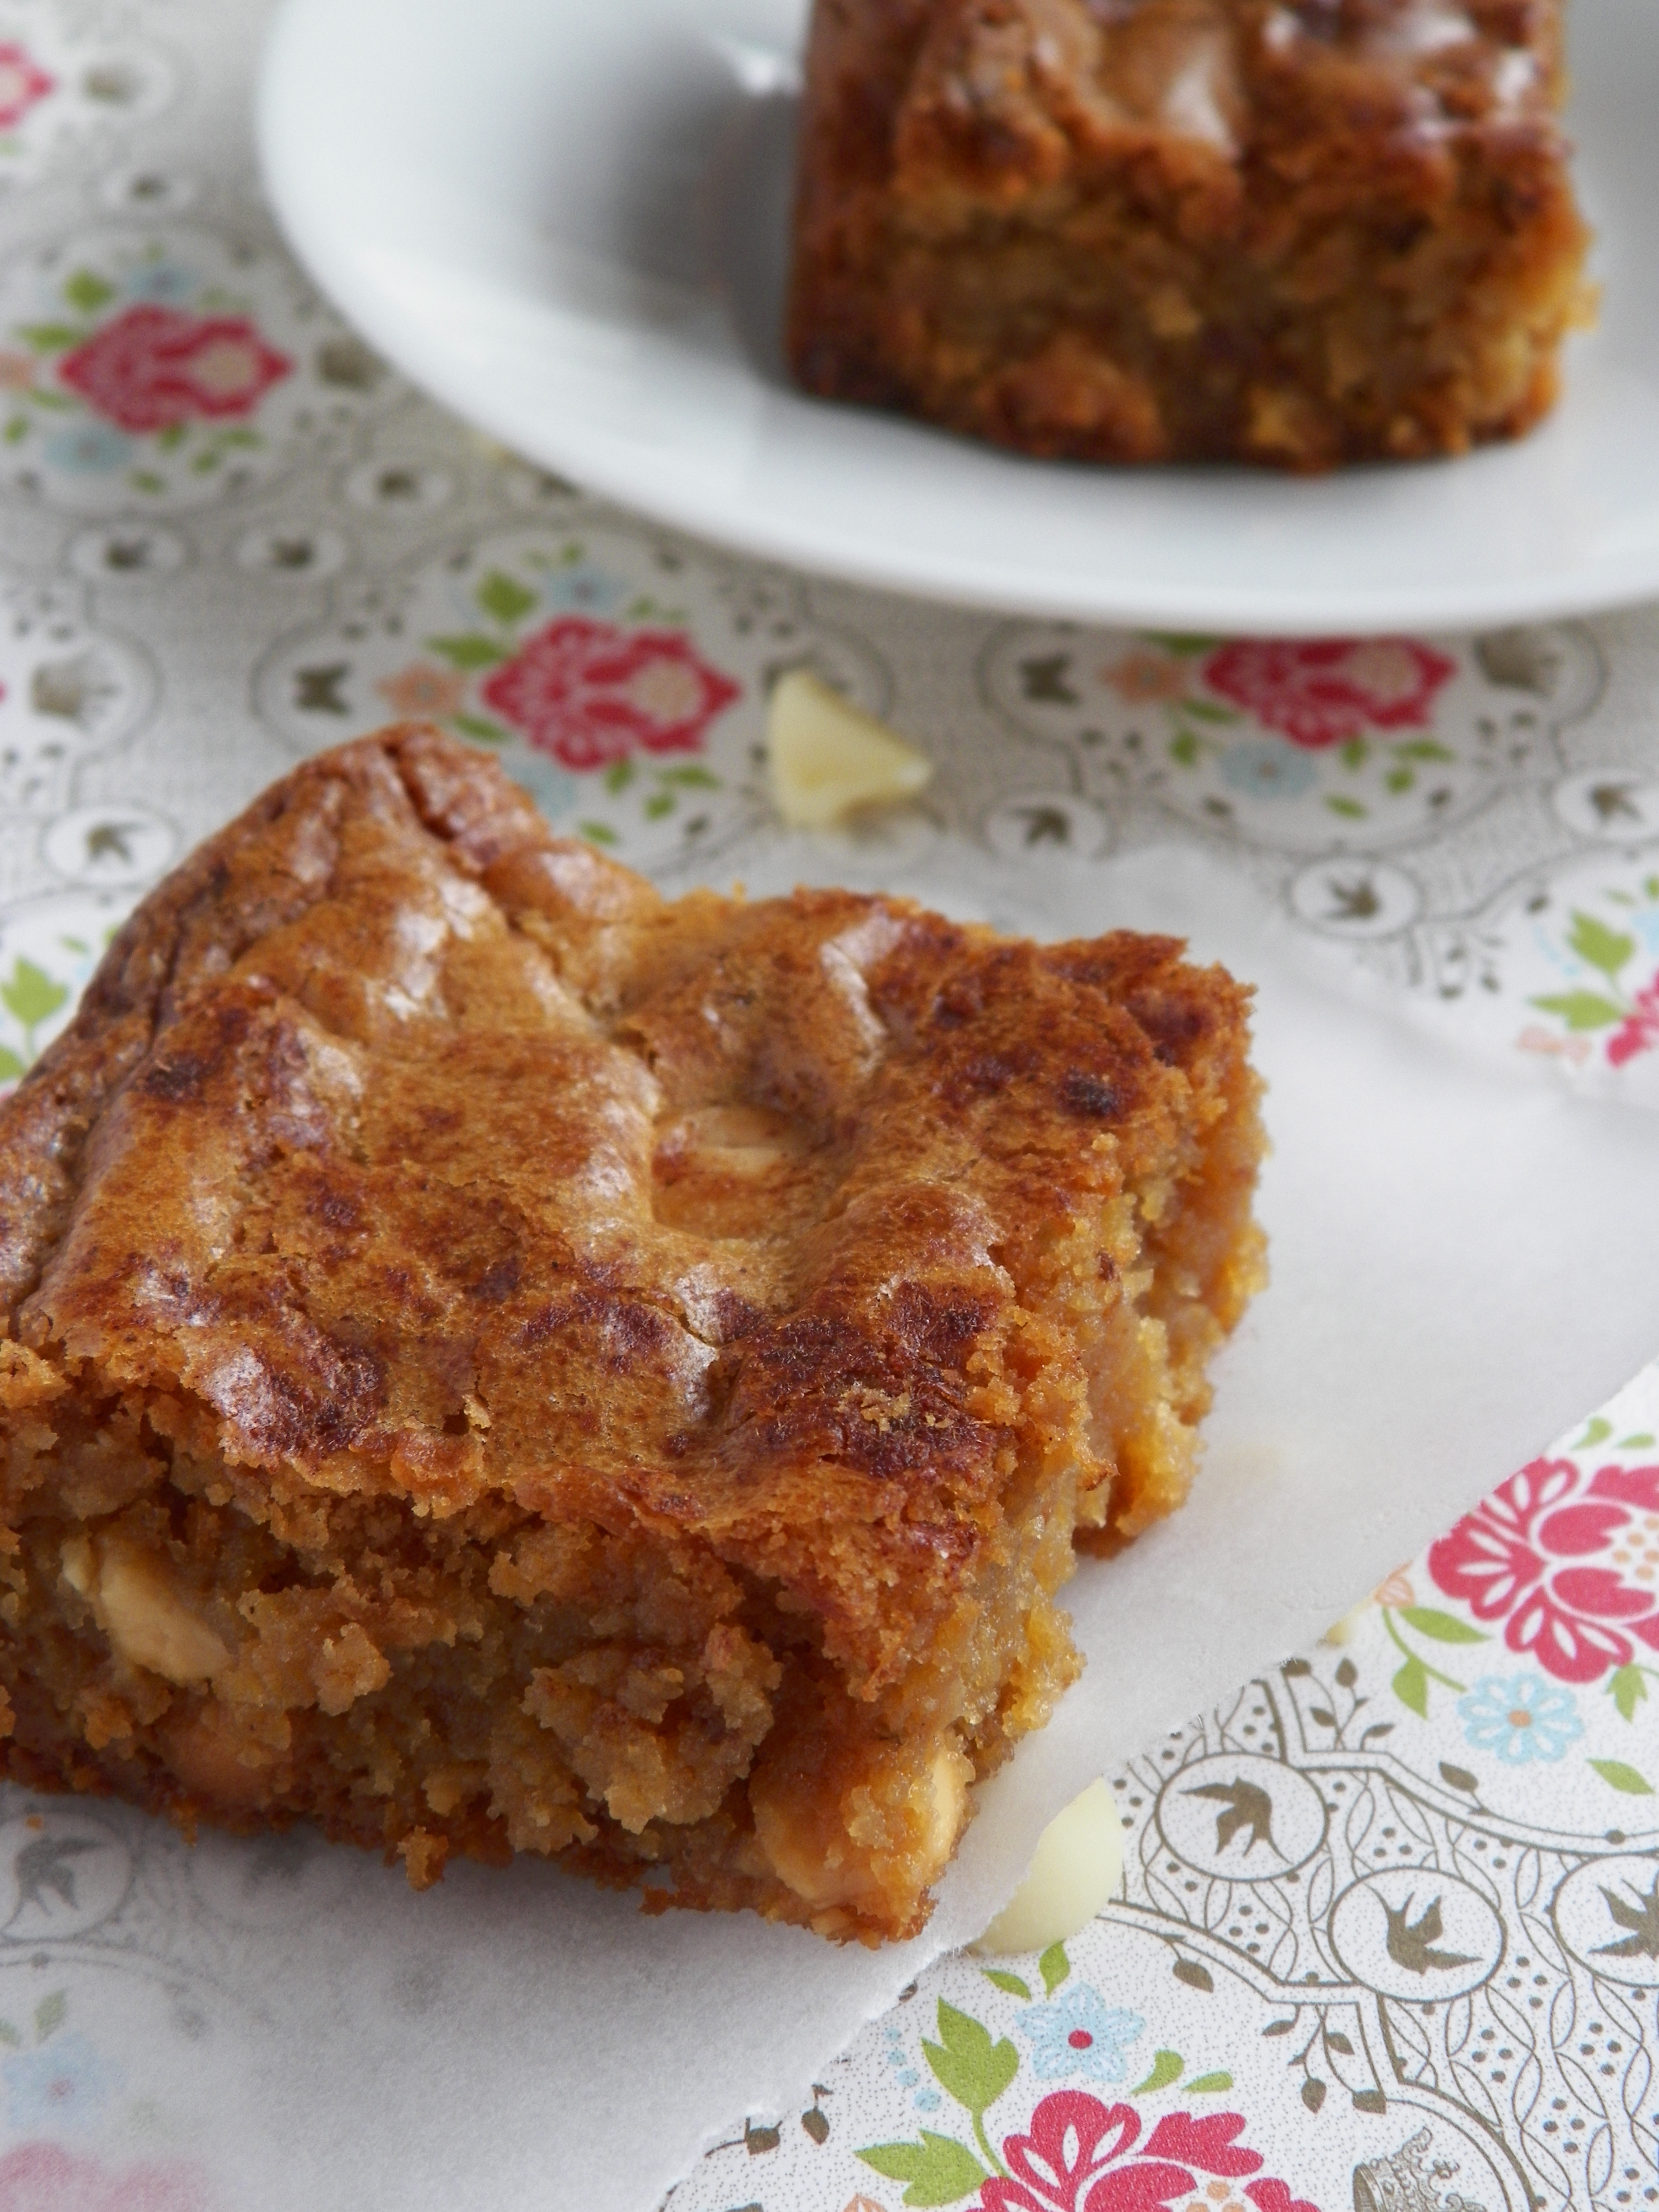
Delicious. Is just what this delightful pan cookie was. I have been wanting to make one of these for a while now, and it certainly did not disappoint. Crispy on the outside, soft and gooey on the inside, plus the addition of creamy salted caramel = YUM!

000_0005

 The combination of the sweet white chocolate, salty caramel, and the fresh little pops of the pomegranate seeds were a really great mix together. However, I also made smaller cookies on their own, which were delicious, but very, very soft, due to the amount of salted caramel I added! This combination is perfect for a pan cookie, topped with more pomegranate and some ice cream. Plus, these are so easy to make, and are a great dessert to share, or not to share 😉

000_0006

 Pomegranate, Salted Caramel and White Chocolate Pan Cookie: 

Makes 1 pan cookie, and approximately 12 smaller cookies. You could halve this recipe for the pan cookie only.

  • 125g butter, chopped and softened, not melted
  • 1/2 cup brown sugar, tightly packed
  • 1/2 cup castor (white) sugar
  • ½ tsp vanilla bean paste/natural extract
  • 1 egg
  • 1 3/4  cup self-raising flour
  • Pinch of sea salt
  • 250g good quality white choc chips
  • 2 tbs salted caramel (I used a homemade one, but you could also use Dulce de Leche, Nestle Top ‘N’ Fill Caramel)
  • Seeds of ½ a pomegranate

Preheat the oven to 160c. Grease a small non-stick pan (I used a 17cm pan) with butter, and set aside. Beat the butter and sugar together until pale and creamy, approximately 3-4 minutes. Add the vanilla, and the eggs, one at a time until well combined. Stir in the flour with a wooden spoon, until completely mixed. Add the chocolate, salted caramel and pomegranate seeds, and mix well. Spoon mixture into prepared pan, filling it to the top, and smooth over mixture with a spoon. Place in pre-heated oven, and bake for 15-20 minutes, or until golden. Let cool for 5 minutes, and top with more pomegranate seeds and ice cream. Enjoy!

000_0004

FYI – you could easily use a bigger or smaller pan for this recipe, you would just need to adjust the cooking time, and keep an eye out for when the cookie is golden, or to your liking 🙂 Also, sorry for the crappy photos. I had to quickly snap away before the sun went down!

000_0008

Halloween Spooky Spider Chocolate Oreos

Can you believe it’s Halloween already?! I’m a little bit excited about this, as it means it’s getting nice and close to the best time of year – Christmas! Halloween is not really a huge deal in Australia, although it seems to have become more popular in recent years. This is only the second post I’ve ever done on Halloween, and I’m definitely looking forward to doing more. There are some pretty cool baking ideas I found on Pinterest for Halloween. People are so creative. These Oreos, however, are probably not the most creative. They are, in fact, very easy to make and insanely delicious.


000_0005

I am a little bit obsessed with chocolate covered Oreos at the moment. I see stacks of them on Instagram, and some people make them look  like the most amazing little morsels of sparkly treasure, and you would never know that a humble Oreo biscuit was nestled inside. I have officially been inspired. Yum.

000_0002

So, why not cover an Oreo with a totally justifiable amount of chocolate, and then whack another Oreo on top? Just as well I could turn them into spiders, and that it’s coincidentally the week of Halloween!

000_0004

My chocolate piping skills are very obviously flawed! I can’t say I have really ever piped melted chocolate before, and it’s really not the easiest thing to do. The designs on these Oreos definitely could have been cleaner, but I don’t mind too much as the taste totally makes up for it! There is no recipe for these Oreos, it’s pretty self explanatory. A little bit of chocolate in the mould, the Oreo, and more chocolate. You just have to have the right moulds (I got mine from Baking Pleasures).

These Oreos are awesome. They are quick and easy to make, a great idea for cooking with kids and super versatiile – you can make them any colour and design them however you wish, and best of all, they are super delicious.

Happy Halloweeeeeeeeeeen!

000_0006

Vanilla Bean and Raspberry Melting Moments

Melting moments are one of my favourite biscuits to make, and one of my favourite doughs to eat! (Let’s face it, there aren’t many doughs that I wouldn’t eat!) They are so yummy, and this version takes the usual melting moments up a notch, with delicious homemade raspberry jam and vanilla buttercream.

000_0004

This recipe was featured on Masterchef Australia 2 years ago (I think?!), and won contestant Julia a challenge. I have been wanting to make these for a long time, like many others things, but I am very glad I finally did. They really are delicious and were certainly worth the wait! Yum! I will most definitely be making these little gems again.

000_0002

Vanilla Bean and Raspberry Melting Moments: (recipe by Julia Taylor on Masterchef Australia)

I doubled the original recipe, as it said it would only make 5 sandwiched biscuits. I ended up with about 25 with a double batch, although I did try and make them small.

Biscuits:

  • 360g unsalted butter, chopped and softened
  • 120g icing (confectioner’s) sugar
  • 120g custard powder
  • 1 tbs baking powder
  • 360g plain (all-purpose) flour

Preheat a fan forced oven to 180c. Line 2 oven trays with non-stick baking paper. Beat the butter until pale and creamy, about 2-4 minutes. Add the sugar and custard powder, and stir with wooden spoon until well combined. Add the flour and the baking powder to the dough, and stir with a wooden spoon until mixed well. Roll small ball of dough, and place them on the pre-lined oven trays. Press fork lightly onto dough, to leave an indent. Bake for approximately 12 minutes or until very slightly golden. Let biscuits cool on trays, then transfer to wire racks.

Raspberry Jam:

  • 200g fresh or frozen raspberries
  • 150g caster (white) sugar
  • Juice of 1/2 lemon
  • Tbs cold water
  • 1/2 tsp powdered gelatin

Place raspberries, sugar and lemon juice in a medium saucepan, and cook on low-medium heat for about 20-30 minutes, or until thickened. Remove from heat. Place water and gelatin together in a small bowl, and mix until combined. Stir into jam, and place in heatproof bowl, in the fridge, to cool.

Vanilla Bean Buttercream:

  • 250g butter, chopped and softened
  • 1 cup icing (confectioner’s) sugar
  • 2 tsp vanilla bean paste/natural extract

Beat butter until pale and creamy, 2-4 minutes. Beat in vanilla bean paste. Gradually add the icing sugar and beat until all well combined. Spoon buttercream into a piping bag fitted with a medium star nozzle.

000_0005

To assemble:

Place likely pairs of biscuits, facing upwards, next to each other. On one biscuit spoon a small amount of the raspberry jam, and on the other biscuit, pipe a swirl of buttercream. Gently sandwich together. Be sure not to use too much jam as it will just drip out when you press the biscuits together. Biscuits are stored best in an airtight container, in a cool, dry place. FYI – they are also best made the day before, as both the jam and buttercream will set, and the flavour will develop also.

000_0008

Happy Baking! 🙂

Hazelnut Jaffa Melting Moments

I made these little gems for the Australia’s Biggest Morning Tea which was held at work to raise money for the Cancer Council (for those who are not aware!). I just didn’t have the time, or the energy to make macarons this week, but I must admit I was pretty happy with how these melting moments, aka Yoyo’s, turned out. Melting moments were one of my favourite biscuits as a child, only second to the humble Monte Carlo. I thought I would put a bit of a spin on the traditional version, and they went down quite well with my colleagues 🙂 Well enough for one of them to order some for the weekend! Also, my apologies for the crap photos, I had no choice but to take them at night.

IG

I found a great recipe for hazelnut melting moments that used nutella in the ganache, and I thought orange would go perfectly with that. The great thing about melting moments is that they are super easy, just beat the butter and add all the dry ingredients and you’re done. Plus, they kind of look pretty, too, a bit rustic, but pretty. And they melt in your mouth…..mmmmm 🙂
000_0027
Hazelnut Jaffa Melting Moments: (adapted from Taste.com – I doubled the original recipe)
For the biscuits:
  • 250g butter, chopped and softened – not melted
  • 230g plain flour
  • 90g icing sugar mixture
  • 4 tbs cornflour
  • 4 tbs cocoa powder
  • Zest of 1 orange
  • Cocoa powder, extra to dust
For the ganache:
  • 100g dark chocolate, chopped, or choc bit
  • 50g butter, chopped and softened – not melted
  • 5 tbs Nutella (or similar hazelnut spread)
  • Zest of 1/2 an orange
  • 1/2 tsp sea salt
Preheat the oven to 160c. Line 3 baking trays with baking paper, and set aside. Using a stand mixer or electic beater, beat butter until pale and creamy. Add the flour, icing sugar mixture, cornflour, cocoa powder, orange zest and a pinch of salt, and stir with a wooden spoon until well combined. Using clean hands, roll small teaspoons of the dough into balls, and place on the prepared trays (leave about 2cm in between each biscuit). With a fork dusted in cocoa powder, gently flatten the biscuit. Sprinkle each biscuit with a small amount of salt, and bake in preheated oven for 15 minutes. Remove from the oven and let cool for 15 minutes or until biscuits have hardened.
Biscuits
To make ganache, place chocolate in a microwavable bowl and microwave for 20-30 second increments. Each time the chocolate comes out of the microwave, stir as much as possible with a metal spoon to distribute the heat evenly – sometimes the chocolate looks as though it is not melted but will begin to melt when stirred. Doing this will prevent the chocolate burning and becoming gluggy. When chocolate is completely melted, set aside for 3 minutes. Add the 50g softened butter, nutella, orange zest and salt and mix until well combined.
Little poos
Assembly:
Pair up similar sized melting moment biscuits. To fill biscuits, you can use either a piping bag or a knife. To use a piping bag, spoon ganache into a piping bag fitted with a wide round nozzle. Sandwich together with remaining biscuit. Melting moments are best stored in an airtight container at room temperature, and are best consumed within 1-3 days. Yum!
000_0028

Roast Pumpkin and Brown Sugar Blondies

If you are unsure what a blondie is, you are definitely not alone. I showed these to my Dad and got “what on earth is that?!” For those of you wondering, blondies are fairly self explanatory. A blondie is a brownie, made with white chocolate instead of milk or dark. Genius, hey? I think so, because I can assure you these delicious slices definitely taste a lotttttt better than they look.

000_0010

There are lots of great flavours you could put in a blondie. I decided to branch a little out of the ordinary, and I’m pretty happy that I did. I think pumpkin in desserts is great when done well – the humble pumpkin pie is an all time American classic. With a hint of cinnamon, salt and olive oil, the pumpkin in these blondies was quite the delicious bite. It was really subtle, but you could definitely taste it. If I were making it only for myself and other pumpkin lovers, I would have gladly put in a bit hell of a lot more.
000_0006
Pumpkin Mash:
  • 3/4 cup diced pumpkin (if you really love pumpkin you could definitely use more)
  • Olive oil, to drizzle on top
  • Cinnamon, to sprinkle
  • Salt and Pepper
Preheat oven to 190c (180c fan forced). Prepare oven tray with baking paper. Spread pumpkin out on baking paper, drizzle generously with olive oil and mix with hands to coat. Sprinkle with a tiny bit of pepper, salt and a generous amount of cinnamon. Bake for 30-40 minutes or until soft. Remove from oven and let cool slightly for 5 minutes. Place pumpkin pieces in mortar and mash with pestle until it reaches a mash-y consistency, but still a little bit chunky. Set aside.
Pumpkin
Roast Pumpkin and Brown Sugar Blondies: (adapted from Katy’s Lazy Blondies on Nigella Lawson’s forum)
  • 100g white chocolate, chopped
  • 100g butter
  • 200g brown sugar
  • 2 eggs
  • 110g plain flour
  • 100g additional white chocolate chips
  •  roast pumpkin mash

Blondies

Prepare a slice tin (approx. 20cm long) by spraying with olive oil spray or butter and lining with non-stick baking paper. In a microwavable bowl, heat 100g chocolate and butter until melted. For me, this took about a minute and I still had a few lumps, and being a bit silly I heated it for an extra 10 seconds and it curdled a little, but it didn’t make a difference at all to the final product 🙂 Set aside. In a separate large bowl, beat brown sugar and eggs until well combined. Slowly add the chocolate and butter mixture. Stir in the flour gently until fully incorporated. Mix in the additional chocolate chips and the pumpkin mash, and ensure they are evenly distributed. Pour mixture into prepared tin, sprinkle with cinnamon and bake in preheated oven for 30-35 minutes. If you like your brownies/blondies gooey, you can probably take them out a little earlier. Just keep testing with a skewer until you are happy 🙂 Set tin aside to cool, then slice into 15 pieces. Store and serve at room temperature, but they are also delicious warmed up!
000_0009
If you have never tried, or have never heard of blondies, I stongly urge that you familiarise yourself 🙂 You won’t regret it!

Aussie Beach Bum Cookies

Happy (belated) Australia Day! I hope all you Aussies had a great long weekend and celebrated with some snags on the barbie, a meat pie and a pav! If you are not an Aussie, you should definitely still celebrate with some snags on the barbie, a meat pie and a pav – or make some of these super cute and cheeky beach bum cookies to embrance your inner Australian! I saw these cookies on Pinterest a while ago, and just had to make them – they are too cute! They are really easy to make and decorate too.
000_0004
This recipe is once again from the fantastic Sweetapolita – they are basically the vanilla version of the Dark Chocolate Sugar Cookies with Gingerbread Buttercream that I made for Christmas. I halved the recipe, and I still had close to 50 cookies, so if you do not want that many, you could simply halve it again. You can put any flavour you like in the cookies as well. I was loyal to the recipe and kept the vanilla bean with a touch of lemon, but you could use any type of extract or oil really, such as Strawberry, Orange, or even Musk.
000_0002
Vanilla Sugar Cookies: (adapted from Sweetapolita – this post has a great tutorial on making sugar cookies, too!)
  • 1 cup butter – softened, not melted
  • 1 cup caster (white) sugar
  • 1 large egg
  • 3 cups plain (all-purpose) flour
  • 1/2 tsp vanilla bean paste
  • Juice of 1/2 lemon
  • 1/2 tsp salt
  • 3 cups (approx.) icing sugar mixture
  • Water
  • Cachous and sprinkles, to decorate
  • Colouring gels

Preheat the oven to 160c fan forced, 170c non fan forced. Line 4 oven trays with baking paper, and set aside. Beat the butter and sugar in a large bowl until pale and fluffy. Beat in the egg until well combined. Sift flour and salt in a separate bowl, and gradually stir, with a wooden spoon, into the butter and sugar mixture. Knead the dough on a floured surface until smooth – keep adding flour in very small amounts if dough is still sticky. Divide dough into two batches, wrap tightly in cling wrap, and refrigerate for 45 minutes. Once dough is chilled, roll it out with a rolling pin, between two sheets of baking paper, until the dough is just under 1cm thick. With a heart shaped cookie cutter, carefully cut the shapes from the dough and place on the baking paper. When you have a full tray, gently and quickly cut the bottoms of the hearts off with a sharp, non-cerated knife. You don’t want to use a cerated bread and butter knife because it’s not sharp enough, and will cut a rough edge, rather than a clean edge. The only thing I would do differently when I make these again, would be to get a larger cookie cutter and cut off more from the bottom of the heart, so that they look like bigger, rounder bums!! Bake cookies in preheated oven for 12-15 minutes – make sure you check at 10 minutes! TIP – Don’t wait until the cookies begin to go brown – once the edges a even a tiny bit brown, the biscuits will be that overcooked you could nearly break your teeth on them! Make sure all the cookies are still completely ‘blonde.’ Let the cookies cool completely on the trays or wire racks until completely cool – you don’t want the icing to melt off!

 Cookies

To make the icing, combine icing sugar mixture with a tiny amount of water to make a paste. You can make as many or as little colours as you like – three was enough for me. Add a little of the colouring gel and a small amount of vanilla and stir until combined. Place icing in a piping bag fitted with a realllllllly small round nozzle. If you don’t have one, never fear! You can use a snap lock bag and cut the corner off. Decorate the cookies by piping different shapes and colours of underwear! G-Strings are the easiest to do 😛 The icing dries really quickly, so decorate the cookies as you go.

000_0005

I can’t believe it is the end of January already, it seemed like only yesterday it was Christmas! Happy belated Australia Day, and I’ll see you in February 🙂 Also, check out my music player on the side of the page, I will putting up some of my favourite songs for you to listen to when you come and visit!

Best of 2012!

Here is a collection of photos that sums up the best foodie moments of 2012. I have loved every minute of delving into the blogging world, and cannot wait to continue next year 🙂 HNY!

Macarons:

Macarons

Macarons1

Macarons2

Macarons3

Cakes:


Cakes1

Cakes2

Cakes3

Cakes4


Bits and Pieces:


Pizza making class, High Tea with Zumbo, myself with Gary Mehigan

Pizza making class, High Tea with Zumbo, myself with Gary Mehigan


Homemade Ravioli and Gnocchi, Curries cooking class on a boat, Sipping cocktails at Sea Links Resort in Mui Ne, Vietnam.

Homemade Ravioli and Gnocchi, Curries cooking class on a boat, Sipping cocktails at Sea Links Resort in Mui Ne, Vietnam.


Treats from Little Cupcakes and La Belle Miette, Pasta and Black Risotto at Grossi Florentino, Homemade dumplings

Treats from Little Cupcakes and La Belle Miette, Pasta and Black Risotto at Grossi Florentino, Homemade dumplings


Homemade Caramel Ice Cream, Homemade Apple Pie, Sipping sparking in the Yarra Valley, making Neil Perry's Mac and Cheese.

Homemade Caramel Ice Cream, Homemade Apple Pie, Sipping sparking in the Yarra Valley, making Neil Perry’s Mac and Cheese.


Chocolate Dumplings and Custard Buns at Yum Cha @ David's, Prahran.

Chocolate Dumplings and Custard Buns at Yum Cha @ David’s, Prahran.


Melted Snowmen Shortbread, Candy Cane Macarons, Dessert @ Malvern Hotel, Salted Caramel Profiteroles.

Melted Snowmen Shortbread, Candy Cane Macarons, Dessert @ Malvern Hotel, Salted Caramel Profiteroles.


Happy New Year! 🙂 Xo


Dark Chocolate Sugar Cookies with Gingerbread Buttercream

I have seen a couple of fellow bloggers make these super-cute cookies lately, and I have really wanted to try making them myself too, especially since the recipe is from the wonderful Sweetapolita! These cookies most definitely lived up to my expectation. Not only were they soooooo yummy, but they were really easy to make and even with halving the recipe, I still had 40 sandwiched cookies!
000_0014
Another thing I love about these cookies is that you can do anything with them. You can leave them plain, just decorate them or fill them. I decided on the previous two. My blogging buddy Sugabuttacream filled hers with espresso buttercream, which would be great to try as well. Gingerbread buttercream is definitely one of my favourites around Christmas time, it is so yummy and easy to make, plus it keeps really well and the flavour tends to develop over a couple of days.
000_0012
Dark Chocolate Sugar Cookies: (recipe adapted from Sweetapolita – makes 40 sandwiched cookies, 80 single cookies)
  • 3 cups plain flour
  • 3/4 cup good quality cocoa
  • 1/2 tsp salt
  • 225g butter, chopped and softened – not melted
  • 1 cup caster sugar
  • 1/2 cup brown sugar
  • 1 large egg
  • 1 tsp vanilla bean paste/vanilla extract
Sift flour, salt and cocoa into a bowl and set aside. Place butter and sugars in bowl, and beat until pale and creamy. Add egg and vanilla, and beat well until combined. Stir in dry ingredients until mixure forms a dough.
On a floured surface, knead half of the dough until it becomes smooth. Shape into a ball. If you want to use dough straight away, refrigerate for 30 minutes. If you are using it in a few days time, freeze the dough. Remove from freezer 2-3 before use and leave it to thaw at room temperature. Repeat kneading with other half of mixture.
Preheat oven to 160c, and line 4-5 oven trays with baking paper. Place one ball of dough between 2 sheets of baking paper. With a rolling pin, roll dough out until it is about 1cm thick. With a cookie cutter, cut shapes out from the dough and carefully place them on baking paper. When tray is filled place in the oven for 10 minutes, or until the cookies are just slightly soft. Let them cool on trays, then place on a wire rack.
Choc Sugar Cookies
Sugar Icing (for decorating):
  • Icing sugar, about 1 1/2 cups
  • Water
  • Wilton’s colouring gel, green
As per the icing I used for the Melted Snowmen, I didn’t really use exact measurements. I combined icing sugar and water until it became a thick paste, then added the green colouring. With a piping bag fitted with a very thin round nozzle, I piped around the edges of the trees, and added a few gold and silver cachous as the decorations. The icing dries really quickly, so add the cachous as you go.
000_0016
Gingerbread Buttercream:
  • 350g salted butter, chopped and softened – not melted
  • 1 1/2-2 cups icing sugar
  • 1 1/2 tsp ground ginger
  • 1 tsp ground cinnamon
  • 1 tsp mixed spice
Beat butter until pale and creamy. Gradually add the icing sugar and other spices. If you only want a hint of the spices, you could add bit less, and if you want a strong hit of ginger, you can add more. You can just keep tasting, but these quantities, for me, are just the right balance 🙂 If you are not using the buttercream until the following the day or after, refrigerate, then take out of the fridge an hour before use. As mentioned earlier, I personally like to make it a couple of days in advance because the flavour of the spices tend to develop. Place the buttercream in a piping bag fitted with a round nozzle. Pipe 2 lines of buttercream down the middle of the tree biscuit, then sandwich with another. You can either refrigerate the cookies, or leave them in a cool, dry place.
Piping...
I hope you all had a lovely Christmas, I can’t believe it’s all over for another year! It’s sad but also kind of a relief at the same time. Here are some of the yummy things my family had on Christmas Day (minus the oysters – ew!!).
Christmas Day
January the 1st also marks whiskitforabiscuit’s first birthday – so thank you to everybody who has supported my baking endeavours throughout the past year by coming to visit my site! It is slowly growing in terms of views and followers, which is really exciting to see, so please feel free to comment, like and follow – it would be greatly appreciated! So thank you all so much, and I sincerely hope you come back to say hi in the new year 🙂 Xx
000_0011

Melted Snowmen Shortbread

Wow. What a crazy busy few weeks it has been! I cannot believe I haven’t baked anything Christmassy until now, I had so much planned to do in the last couple of weeks, but I always seem to be way too ambitious when Christmas baking is concerned. So, here we are – shortbread on the 13th of December! They are certianly no culinary masterpieces, but it is great shortbread though, even if I say so myself. And they are quite cute. And this is exactly what would happen if we could make snowmen at Christmas in Australia.

Follow me on Instagram - GemmaAsh

Homemade shortbread has always been one of my favourites around Christmas time, and this is actually the first time I have properly made it myself (you can probably tell – they are far from consistent!). I used a Taste.com recipe, surprise, surprise, and it was awesome – really buttery and melted in your mouth. One of the things I love about shortbread is that it is sooo easy to make. It has 5 ingredients that would usually be in your pantry anyway. The dough is pretty tasty, too. Tasty enough that we probably lost a snowman or two due to my severe lack of self-control when it comes to dough.

Yummy

Shortbread: (recipe adapted from Taste.com) Makes 18 large snowmen.

  • 250g butter, chopped and softened
  • 1 cup icing sugar
  • 1/2 vanilla bean paste or vanilla extract
  • 2 cups plain flour
  • 1/2 cup cornflour

Preheat oven to 160c. Line 3 oven trays with baking paper. Beat butter, icing sugar and vanilla until pale and creamy. Add the flours and stir to combine. Turn the dough out onto a floured surface, and knead until smooth. If you find the dough too sticky, just add a bit more flour when kneading. Wrap the dough tightly in cling wrap, and refrigerate for 20 minutes.

Cut dough in half, and roll out with a rolling pin between two sheets of baking paper, until the dough is about 1-1/2cm thick. With a ring mould, or a round cookie cutter, cut circles out from the dough and place them on the baking trays. Cook for 20-25 minutes. The shortbread should not be too ‘blonde’ as they would say on Masterchef! I tried to take mine out just as they were beginning to go a tiny bit golden. Let cool on trays for 15-20 minutes.

Shortbread!

Turning the shortbread into Melted Snowmen:

  • 18 white marshmallows
  • Silver cachous
  • Orange sprinkles
  • Icing sugar
  • Lemon juice
  • Water
  • Vanilla bean paste
  • Edible black pen (these are fantastic, I bought mine from Baking Pleasures)

To be honest, I didn’t measure out the ingredients in the icing. I used a small-medium bowl, and started off with approx. 1/2 cup icing sugar, and probably 2 tsp of water. Mix the sugar and water together, then add the vanilla and lemon juice. It needs to be fairly thick, but still spreadable enough to move around on the shortbread. It should be this consistency. and should be well balanced with vanilla and lemon 🙂 This icing dries really quickly, so keep giving a stir every now and then.

Like this...

Draw faces on the marshmallows, I made them sad and confused, as they had just endured a serious heatwave!


Place a wire rack on top of some paper towel. Pour a teaspoon of icing onto the shortbread, and spread out to make it look as though the icing is dripping off the sides. Place a marshmallow on the shortbread, and 2 or 3 silver cachous in front if the marshmallow. Push an orange sprinkle into the marshmallow for the nose. Yum!

Heatwave...

These cute, sad little snowmen are great for the kids to make. They are really easy and fun to decorate 🙂 Plus, the shortbread tastes really good, too. Enjoy, and stay tuned for some more Christmas baking goodness 🙂 X


M&M Cookie Dough Macarons

Ever since I’d laid eyes on this cookie dough buttercream recipe from Raspberri Cupcakes and Annie’s Eats, I’ve wanted to make something a little out of the ordinary with it and I’ve had quite a few ideas. Due to of the colour of the buttercream, I really wanted to make something super bright. I thought a bright blue macaron shell and M&M’s would do the trick. So, here we are.

Often when I make bright macaron shells, the colour can bake out a little, but these babies stayed nice and blue, albeit a slight green tinge. It worked really well though, because of all the different colours of the M&Ms.

I used my usual macaron shell recipe, and added about half a teaspoon of Wilton’s colouring gel. I was careful not to go too crazy with the colouring – I wanted to avoid what happened with the Salt and Vinegar Macarons. As the blue gel is so concentrated, it was perfect 🙂

I lovvvvvvvvvvved the cookie dough buttercream! It is really easy to make, is so versatile (can’t wait to make cookie dough cupcakes!), and it doesn’t have scary raw egg (which is a bonus for me because I’m allergic!).

I totally recommend making this buttercream, because it is sooo easy! The list is endless with what you can make (think filled cupcakes, cookie sandwiches, layer cakes or even ice cream – or just eat it out of the bowl?), and you can a million types of chocolate and/or lollies 🙂 Yum!

Excuse the small post, but stay tuned for a nice big one for next week! 🙂