Pork Belly with Apple Cider Vinegar Gravy and Roasted Apples

I can’t believe Christmas is over already! 😦 This makes me a bit sad, because it is, by far, my favourite time of the year. My favourite time from this Christmas was probably eating this pork belly. It was that good, even if I do say so myself. Pork Belly is hands down, one of my favourite foods in general. If the piece of tender meat along with the layer of juicy fat isn’t enough to whet your appetite, then the thick slab of crispy, salty crackling (that should always be there) surely must!

Served

The recipe that I used was awesome to say the least, and it will certainly be making a regular enough appearance on my kitchen table. I searched for awhile to find a recipe I was happy with, and that didn’t seem too hard, because pork belly is definitely not the easiest thing to cook. I really loved the roasted apples that went with the pork, because they were all lovely and caramelised from the butter and brown sugar I put with them in the oven, and it was a welcome change from the standard super sweet store bought apple sauce! Plus, the whole apples look much nicer on the plate, too.

Apples, butter and sage

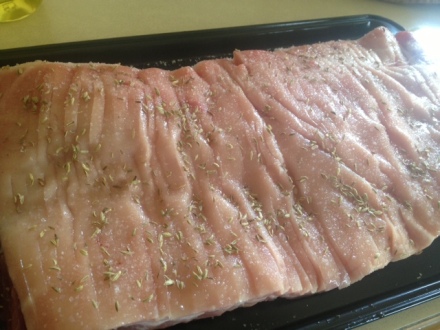
I’m not going to worry about writing the recipe out for you, because I followed it word for word from Taste.com, my go to site for awesome recipes. You can find it here. If you are going to try cooking pork belly yourself, I have a couple of tips for you. Not that I am an expert on the subject, but they certainly helped me out. Firstly, ask your butcher to score the pork rind for you, it makes preparing the meat a lot easier. Second, do not be afraid of salt! Salt will draw moisture out of the pork, and create crispy, crackly goodness. I put three layers of coarse sea salt on my rind, along with the fennel seeds called for in the recipe. Lastly, if your pork is not as crispy in the middle as it is on the edges, it is okay to leave it in the oven for longer, just turn down the temperature a little, and it is unlikely that the meat will dry out.There is a lotttttttttttt of fat in pork belly, it will keep the meat moist.

Before1

And, of course, enjoy every moment of eating that pork. I am not often happier than I am when eating freshly roasted pork crackling, as silly as it sounds. I love it!

After

I hope you all had a wonderful Christmas, and enjoy bringing in 2014! Thanks very much for reading whiskitforabiscuit’s adventures this year 🙂 See you next year. Happy Baking!

Salted Butter Popcorn Macarons

Macs are back! This makes me very happy. Very happy indeed. As you would have seen earlier in the year, the last time I made macarons, it didn’t go so well. These still weren’t perfect, that’s for sure, but they do look like macarons, and they taste pretty amazeballs. And that’s all I really care about 🙂

IG

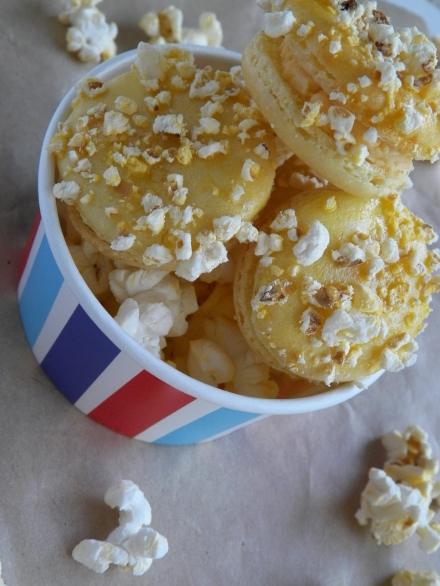
This mac flavour is from Zumbo’s Fantasy Land of Macarons (p. 57), and the recipe had intrigued me for a quite a while, but I was just a bit scared to give them a go. I’m very glad I did though, because they were definitely worth it. Surprising or not, they taste exactly like a big mouthful of butter popcorn, just with a few different textures. I am a massive fan of sweets with salt, so these were a major winner in my eyes! The only thing I think I would do differently next time, would be to blitz the popcorn a bit more, because I had some big chunky bits on my shells, so they didn’t look quite as dainty as Zumbo the Great’s.
000_0010

Macarons:

This recipe is Adriano Zumbo’s, and was published a couple of years ago in the Herald Sun. You will definitely need kitchen scales to make macarons.

  • 135g almond meal
  • 135g icing sugar
  • 125g caster sugar
  • 45g egg whites
  • 50g egg whites
  • 40g water
  • 1/4 tsp colouring gel, yellow

Spray four oven trays with cooking oil spray around the edges, and line with baking paper and set aside. Place almond meal and icing sugar in a large bowl, and sift together 3 times. Set aside, along with the 45g egg whites. Put 50g egg whites in a separate bowl. Heat caster sugar and water in a small saucepan, over a low-medium heat, until the sugar completely dissolves (if it slightly burns my tongue, it’s done!). If you do not want to burn your tongue, Zumbo suggests investing in a candy thermometer and heating the syrup until it reaches 118 degrees C (244 degrees F). If the syrup becomes thick and powdery in appearance, you will need to start again. This is because the sugar has been heated too much, too quickly, and instead of dissolving, it has cooked.

Begin beating the 50g egg whites with one hand, and with the other, stream the hot sugar syrup down the side of the bowl to create an italian meringue. Beat until stiff peaks form, the meringue should be thick and very glossy. If you want to add flavouring/colouring, now’s your moment. So add the colouring now. Just lightly beat them into the meringue. Pour meringue into the almond meal, icing sugar and 45g egg whites mixture and mix roughly to combine. When combined, fold mixture together (one single stroke) until there are no air bubbles left. Make a spread across the top of the mixture, and it should disappear in about 20 seconds. Spoon mixture into a piping bag fitted with a round nozzle. (If you don’t have a piping bag set, most supermarkets sell plastic ones, they are Multix brand, in an orange box and contain 5 piping bags with a few different nozzles, plus they’re only about $3. You should be able to find them in the baking aisle). Lock the bag by spinning the top around 4 times. Pipe 3-4cm rounds on the oven trays prepared earlier. Tap the bottom of the trays on the kitchen bench and let them sit for about half an hour, or until mixture is dry to the touch. Meanwhile, preheat the oven to 145c (135c fan forced).

Making

Place in oven and bake for 16-20 minutes. Check macarons at 16 minutes, and to test if they are cooked, pull a macaron off the baking paper. If it is stuck, keep cooking and checking regularly. Cool on trays for 5 minutes, then peel off and place on a wire rack. The mixture should make about 12 -15 large macarons, and about 25 smaller macarons. Macarons keep really well (about 5 days in the fridge) and some say that the longer they are refrigerated, the more the flavour is likely to develop. Macarons taste best when they are stored in the fridge, then brought down to room temperature to eat.

000_0013

Buttercream: (from Zumbarons: A Fantasy Land of Macarons, p.57.)
(I still made the full recipe, even though it could have filled double the shells I had. I am sure I will use it for something…maybe eating it from the bowl…maybe…)
  • 100g caster sugar
  • 38g water
  • 75g lightly beaten egg
  • 45g egg yolks
  • 200g butter, chopped and softened
  • Sea salt, to taste
You will need digital scales and a thermometer to make this buttercream. The thermometer I use is just an ordinary one used for coffee. You can find them at homeware or discount stores.
Beat the butter until pale and creamy, about 4 minutes. Put the egg and egg yolks together in a large bowl, and set aside. In a small saucepan, combine the sugar and water, and cook over a low-medium heat until sugar dissolves. Turn the heat up to medium, and cook mixture until it reaches 121c. Begin beating the eggs for a minute or so, and then very slowly pour the sugar syrup down the side of the bowl into the egg mixture. Continue whisking the mixture until it is thick, and cooled to 50c. A teaspoon at a time, add the butter to the egg and sugar mixture, and mix well after each addition to ensure there is no lumps. Once all the butter has been incorporated, fold in the salt to taste. It should look a little something like this:
Buttercream
Assembly:
Cook the microwave popcorn according to instructions. Blitz approximately half of the popcorn in a food processor, until they look like small chunky crumbs. Place popcorn on a large plate or in a shallow bowl. Pair up macaron shells. Spoon buttercream into a piping bag fitted with a round nozzle, and pipe 1/2 tsp onto shells, and sandwich with another. Melt 1 (if you want to brush 1 shell) or 2 tablespoons of butter (if you want to brush both shells) and completely brush the shell/s with the melted butter.
000_0005
Immediately place buttered shell/s into the popcorn and place on an oven tray with baking paper. Once you have completed all of the macarons, place in fridge to set overnight. This will help develop the flavour. After 24 hours or so, place macarons in airtight container if not serving immediately. Store in fridge, and bring down to room temperature to serve.
000_0001

Best of 2012!

Here is a collection of photos that sums up the best foodie moments of 2012. I have loved every minute of delving into the blogging world, and cannot wait to continue next year 🙂 HNY!

Macarons:

Macarons

Macarons1

Macarons2

Macarons3

Cakes:


Cakes1

Cakes2

Cakes3

Cakes4


Bits and Pieces:


Pizza making class, High Tea with Zumbo, myself with Gary Mehigan

Pizza making class, High Tea with Zumbo, myself with Gary Mehigan


Homemade Ravioli and Gnocchi, Curries cooking class on a boat, Sipping cocktails at Sea Links Resort in Mui Ne, Vietnam.

Homemade Ravioli and Gnocchi, Curries cooking class on a boat, Sipping cocktails at Sea Links Resort in Mui Ne, Vietnam.


Treats from Little Cupcakes and La Belle Miette, Pasta and Black Risotto at Grossi Florentino, Homemade dumplings

Treats from Little Cupcakes and La Belle Miette, Pasta and Black Risotto at Grossi Florentino, Homemade dumplings


Homemade Caramel Ice Cream, Homemade Apple Pie, Sipping sparking in the Yarra Valley, making Neil Perry's Mac and Cheese.

Homemade Caramel Ice Cream, Homemade Apple Pie, Sipping sparking in the Yarra Valley, making Neil Perry’s Mac and Cheese.


Chocolate Dumplings and Custard Buns at Yum Cha @ David's, Prahran.

Chocolate Dumplings and Custard Buns at Yum Cha @ David’s, Prahran.


Melted Snowmen Shortbread, Candy Cane Macarons, Dessert @ Malvern Hotel, Salted Caramel Profiteroles.

Melted Snowmen Shortbread, Candy Cane Macarons, Dessert @ Malvern Hotel, Salted Caramel Profiteroles.


Happy New Year! 🙂 Xo


Maple Bacon Macarons

My love of combining sweet and salty flavours is certainly well documented throughout this blog! Maple bacon is something I have wanted to try making for a while, but struggled about what I would do with it. So, I stuck to what I am best at, macarons.

I decided to use a cream cheese icing for the filling – it is definitely my favourite kind of icing, made even yummier with the addition of real maple syrup. The bacon, seriously, I could have happily eaten the whole tray (I know I say this with a lot of things!), but it was delicious – like a lolly with an awesome salt kick! Yum 🙂

I know there haven’t been as many posts as I would have liked in the past couple of months, but with Christmas coming up, there will probably be one nearly every day! I have just finished my Christmas baking list, and it’s safe to say I don’t think I will be leaving the kitchen for the month of December!

Macarons:

This recipe is Adriano Zumbo’s, and was published a couple of years ago in the Herald Sun. You will definitely need kitchen scales to make macarons.

  • 135g almond meal
  • 135g icing sugar
  • 125g caster sugar
  • 45g egg whites
  • 50g egg whites
  • 40g water

Preheat oven to 170c (160c fan forced). Spray four oven trays with cooking oil spray baround the edges, and line with baking paper and set aside. Place almond meal and icing sugar in a large bowl, and sift together 3 times. Set aside, along with the 45g egg whites. Put 50g egg whites in a separate bowl. Heat caster sugar and water in a small saucepan, over a low-medium heat, until the sugar completely dissolves (if it slightly burns my tongue, it’s done!). If you do not want to burn your tongue, Zumbo suggests investing in a candy thermometer and heating the syrup until it reaches 118 degrees C (244 degrees F). If the syrup becomes thick and powdery in appearance, you will need to start again. This is because the sugar has been heated too much, too quickly, and instead of dissolving, it has cooked.

Begin beating the 50g egg whites with one hand, and with the other, stream the hot sugar syrup down the side of the bowl to create an italian meringue. Beat until stiff peaks form, the meringue should be thick and very glossy. If you want to add flavouring/colouring, now’s your moment. Just lightly beat them into the meringue. Pour meringue into the almond meal, icing sugar and 45g egg whites mixture and mix roughly to combine. When combined, fold mixture together (one single stroke) until there are no air bubbles left. Make a spread across the top of the mixture, and it should disappear in about 20 seconds. Spoon mixture into a piping bag fitted with a round nozzle. (If you don’t have a piping bag set, most supermarkets sell plastic ones, they are Multix brand, in an orange box and contain 5 piping bags with a few different nozzles, plus they’re only about $3. You should be able to find them in the baking aisle). Lock the bag by spinning the top around 4 times. Pipe 3-4cm rounds on the oven trays prepared earlier. Tap the bottom of the trays on the kitchen bench and let them sit for about half an hour, or until mixture is dry to the touch.

Place in oven and bake for 8 minutes. Turn tray around in the oven and bake for another 7 minutes. To test, pull a macaron off the baking paper. If it is stuck, keep cooking and checking regularly. Cool on trays for 5 minutes, then peel off and place on a wire rack. The mixture should make about 12 -15 large macarons, and about 25 smaller macarons. Macarons keep really well (about 5 days in the fridge) and some say that the longer they are refrigerated, the more the flavour is likely to develop. Macarons taste best when they are stored in the fridge, then brought down to room temperature to eat.

Cream Cheese and Maple Syrup Icing: (adapted from Martha Stewart):

  • 112g unsalted butter, chopped and softened
  • 250g cream cheese (I used Philadelphia)
  • 1 cup icing sugar mixture
  • 80ml real maple syrup (I used Queen brand)

Beat the butter and cream cheese on high until pale and creamy. Gradually add the icing sugar and maple syrup. Refrigerate until firm enough to pipe.

Maple Candied Bacon: (adapted from Food Networks Claire Robinson):

  • 250g middle bacon, chopped into 1cm x 1cm pieces
  • 1/4 cup real maple syrup
  • 1/2 tsp wholegrain mustard (I know the recipe says to use dijon, but we didn’t have any and I love wholegrain mustard)

Line a baking tray with two layers of foil, and preheat the oven to 200c (395F). Spread the chopped bacon out on the tray, ensuring no pieces are overlapping. With a pastry brush, brush the bacon with the maple syrup and mustard mixture, ensuring each piece of bacon is evenly coated. Place in the preheated oven for 15 minutes, or until desired crispiness is achieved. You may have to turn some lighter pieces over at the 8 minutes mark. If so, brush with some more syrup. Let bacon cool for 5-10 minutes on the tray. Remove from tray and place in bowl. TIP – you do not want to let the candied bacon cool too much before you remove it from the foil, otherwise the foil will stick to the bacon and it will be really hard to get off. Leave about 25 squares of bacon, and finely chop up the rest so it will be small enough to put around the outside of the macaorn.Try not to eat it all at once 🙂 Trust me, it will be difficult!

Assembly:

Match up likely pairs of macaron shells. Fill a piping bag fitted with a round nozzle, with the maple cream cheese icing. Pipe small rounds of icing on the macaron shells, place a non-chopped piece of bacon on top, and pipe a tiny bit more icing on top of the bacon. Sandwich with the other macaron shell, and place a few finely chopped pieces of bacon around the outside of the macaron. Place macarons in an airtight container. As aforementioned, macarons are best when they are stored in the fridge, then brought down to room temperature to eat.

Anyone thinking of giving this delicious combination a try – do! It’s a perfect Christmas flavour as well, think Christmas hams basted in maple syrup!

Let the Christmas cooking begin!!

Homemade Gnocchi with Burnt Butter and Sage

I have always been a huge gnocchi lover. Well, a huge pasta lover in general, really. I have made this recipe for gnocchi a few times, but not for ages, and this recipe is always really great, light and fluffy just how gnocchi should be 🙂 I decided to pair it with the classic combination of burnt butter and sage – I love the nuttiness of the burnt butter and the crispy sage leaves. This dish marked the beginning of my family’s Easter Sunday feast, and safe to say it was quickly gobbled up by all involved. And I was so excited about it all that I forgot to take photos of the plates until I had eaten about half – sorry!

The recipe is once again from trusty Taste.com – where would I be without Taste?! I know a lot of people are put off my making their own gnocchi because they think it is difficult. If you follow this recipe, and stick to this exact amount of flour, I can almost guarantee your gnocchi will taste like fluffy pillows of heaven 😛 C’mon guys, it’s only potato and flour!!

Potato Gnocchi: (I only cooked about 2/3 of the quantity to serve 5 as an entree, so if you cooked the whole lot it would probably comfortably serve 7-8 as an entree, and 4 as a main)

  • 1 kg red (desiree) potatoes
  • 3/4 plain (all-purpose) flour
  • Salt and Pepper
  • Extra flour for dusting

Line three baking trays with baking paper. Peel skin off potatoes and cut in half. Place in a large saucepan, cover with plenty of cold, lightly salted water, and cook over a medium heat for 20-25 minutes, or until potatoes are soft enough to mash. Drain potatoes well and transfer to a large bowl. Mash potatoes until completely smooth (NO lumps here!), season with salt and pepper, and leave them to cool (I just put them in the fridge for about 20 minutes, and it was cool enough to handle).

Gradually add the flour, and knead until well combined. The dough should be a little bit sticky, but firm. If it is too sticky to work with, add a little more flour – not too much though, you do not want the gnocchi to be gluggy when cooked. Flour a large, flat surface, and roll the dough, in batches with your hands, into long, thin logs. Ensure dough is always dusted with flour and does not stick to the surface. Using a floured butter knife, begin cutting small squares of dough from the logs (about 2 cm wide). Gently press each gnocchi lightly with a fork (these grooves will ensure the sauce sticks to the gnocchi), and transfer to the lined baking trays.

Fill a large saucepan with cold, salted water (or boiling water from the kettle if you’re in a hurry!). Bring to the boil and add the gnocchi. Gnocchi will only take 2-3 minutes to cook, and it will be ready when it floats to the surface. Drain well.

Burnt Butter and Sage Sauce: (these quantities are for the amount I made – 2/3 of the dough, and will serve 5 as an entree)

  •  4 generous tablespoons butter (I used Western Star spreadable)
  • 25 fresh sage leaves
  • Salt and Pepper
  • Lemon juice, to sprinkle
  • Parmesan, to sprinkle

Just before you put the gnocchi in the boiling water to cook, place butter and sage leaves in a large non-stick pan over a medium heat. Cook butter until it turns a nut brown (about 5 mins) and tastes slightly burnt, and the sage leaves are crispy. Add gnocchi, and stir until well combined. Season with a little bit of salt and pepper. Once gnocchi is plated, add a little lemon juice and parmesan. Yum!

I hope everyone had a great chocolate holiday, religious occasion or just a super long weekend! X

Crossaints with Chive Scrambled Eggs

I know this recipe doesn’t sound that exciting, but it tastes so good that I just had to put it up! Chives are by far my favourite herb, I would happily heap them on top of every single meal I have for the rest of my life. And they go SO well with eggs. So yum for a simple breakfast that only takes 10 minutes to make.

  • 4 Crossaints
  • 8 eggs
  • ¼ cup cream
  • ¼ cup finely chopped fresh chives
  • Cracked pepper
  • Smoked salmon (optional)

Cut crossaints open, but not in half. Lightly toast in the grill. Combine eggs and cream in a bowl and lightly beat. Pour into non-stick pan and cook for 3 minutes or until fluffy. Remove from heat, add chives and stir to combine. Spoon eggs onto crossaints, sprinkle with pepper, and serve. Yummmmmmmmmmmmmmmmmm! Serves 4.

Stay tuned for a big post tomorrow!