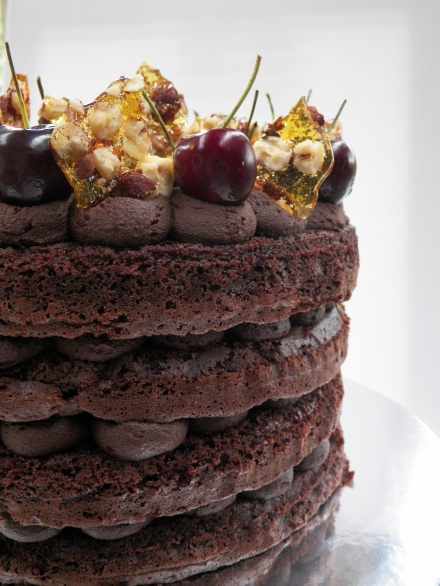
Chocolate Mudcake Layers, with Red Wine Ganache, Fresh Cherries and Hazelnut Praline

Happy New Year to you! I am back with a bang – with this bee-yoo-tiful chocolate mud cake with all the bells and whistles! I hope you all had a wonderful Christmas and New Year, and enjoyed the break with your loved ones. I know I certainly did, and am feeling refreshed and ready to attack 2015 head on!

000_0020
I must say, I am super proud of this cake. I knew exactly what I wanted it to look like, and I had all the flavours imagined in my mind. It turned out perfectly, and it was really delicious, if I say so myself. This cake was inspired by the fantastically awesome Katherine Sabbath. If you don’t know who she is, pretty please check out her Instagram – you will be amazed!
000_0014
The thing I loved most about this cake, apart from how it looked, was the combination of the dark chocolate red wine ganache, and the fresh cherries. The richness of the chocolate and the red wine together, with the hit of the juicy fresh cherries, full of flavour, was downright damned delicious. The cherries here in Australia at the moment are so yummy, and so cheap! Yay for Summer! If only it lasted all year long.
Chocolate Mud Cake Layers: (recipe by Janelle Bloom)
Makes 4 x 23cm layers
  • 400g butter
  • 200g good quality dark chocolate, chopped
  • 1/2 cup water
  • 1/2 cup good quality cocoa
  • 2 tbs good quality drinking chocolate or instant coffee powder, or 1 tbs of each if you want
  • 1 tsp vanilla bean paste/natural extract
  • 2 cups caster (white) sugar
  • 6 eggs, at room temperature
  • 1 1/2 cups self-raising flour, sifted
  • Approximately 500g fresh cherries, stones removed and halved
  • Approximately 30 fresh cherries, with stems (I used a 695g bag altogether, and it was just enough)

Preheat oven to 160c. Line 23cm springform cake tins with baking paper. I had two tins, therefore had to repeat the process.

In a medium saucepan, combine butter, chocolate, water, cocoa, drinking chocolate and/or coffee powder and vanilla. Cook over a medium heat, stirring constantly, until melted and smooth. Remove from heat, and set aside for 10 minutes or until lukewarm.

In the meantime, beat eggs and sugar together in a stand mixer, on medium speed, until pale and creamy. Stream the chocolate mixture down the side of the stand mixer to incorporate into egg mixture. Beat until well combined. Stop the mixer, and add the flour. Beat again until well combined and smooth.

Weigh mixture into four even portions (I did this with digitial scales), to ensure even layers. Pour mixture into prepared tins. Bake for 25 minutes in preheated oven, or until a skewer is inserted, and comes out clean. Repeat process, depending on how many cake tins you have.

Cool cakes for 15-20 minutes in tins, and transfer to a wire rack. If not using immediately, wrap tightly with cling film once cakes are completely cool, and refrigerate. Bring down to room temperature to assemble and eat.

Dark Chocolate and Red Wine Ganache:

  • 500g good quality dark chocolate, chopped
  • 2/3 cup thickened cream
  • 1/2 cup red wine, I used Shiraz

Place chocolate and cream in a medium saucepan, and cook, over a medium heat, stirring, until melted and smooth. Remove from heat, and slowly add red wine. Stir until well combined and mixture is thick (wine will hang at the top of the mixture, but keep stirring, as it may take a couple of minutes for it to be mixed in properly). Pour ganache into a heatproof bowl, cover in cling film, and refrigerate. If using ganache that day, you will need to wait until it is set to use it. It may be a good idea to make the ganache first. If using the next day, you will need to slightly warm ganache in the microwave, for 10 seconds only.

FYI – for best results, beat your ganache in the stand mixer before piping, especially if it has been in the fridge overnight and has been warmed in the microwave. It will make the ganache nice and fluffy, and will be much easier to pipe.

Hazelnut Praline:

  • 1 cup caster (white) sugar
  • 3 tbs water
  • 1/2 cup hazelnuts, roughly chopped

Line an oven tray with non-stick baking paper. Arrange hazelnuts neatly on the tray. Place sugar and water in a medium saucepan, and cook, on a low-medium heat, until sugar has completely dissolved. Then, turn heat up to high, and cook, stirring occasionally, until sugar mixture turns a deep golden colour. Pour sugar mixture over the hazelnuts, and leave to set and cool, which will take approximately 30 minutes. If not using praline immediately, break into pieces and store in an air-tight container, in the freezer. This will prevent the praline from becoming sticky.


000_0022

Assembly:

Spoon mixed ganache into a piping bag with a wide, round nozzle. Place one mud cake on a stand, board or plate. Pipe one round of ganache in the centre of the cake. Place cherries, cut side down, around ganache. Repeat process around the cherries with the ganache, and repeat again. It should go: ganache, cherries, ganache, cherries, ganache (see photo below). Repeat with the second and third layers of mud cake. For the final layer, the top of the cake, do the exact same thing with the ganache, but instead, place the whole cherries on this layer. In addition, place whole cherries on top of the ganache rounds on the edge, just to give the cake a bit more height. Trim the ends of the cherry stems if they are brown, with a pair of kitchen scissors. Arrange praline as desired. ENJOY! 🙂

Layer

This cake was made for my Dad and Nanna’s birthdays, and to see their faces light up when they saw this cake was wonderful, and then again when they tasted it. It really was a labour of love. I hope I get the opportunity to make this special cake again soon.

000_0016

Until next time…x

Follow @whiskitforabiscuit on Instagram here.

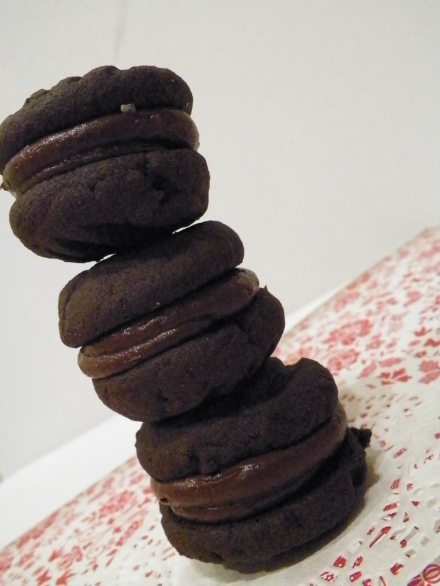
Hazelnut Jaffa Melting Moments

I made these little gems for the Australia’s Biggest Morning Tea which was held at work to raise money for the Cancer Council (for those who are not aware!). I just didn’t have the time, or the energy to make macarons this week, but I must admit I was pretty happy with how these melting moments, aka Yoyo’s, turned out. Melting moments were one of my favourite biscuits as a child, only second to the humble Monte Carlo. I thought I would put a bit of a spin on the traditional version, and they went down quite well with my colleagues 🙂 Well enough for one of them to order some for the weekend! Also, my apologies for the crap photos, I had no choice but to take them at night.

IG

I found a great recipe for hazelnut melting moments that used nutella in the ganache, and I thought orange would go perfectly with that. The great thing about melting moments is that they are super easy, just beat the butter and add all the dry ingredients and you’re done. Plus, they kind of look pretty, too, a bit rustic, but pretty. And they melt in your mouth…..mmmmm 🙂
000_0027
Hazelnut Jaffa Melting Moments: (adapted from Taste.com – I doubled the original recipe)
For the biscuits:
  • 250g butter, chopped and softened – not melted
  • 230g plain flour
  • 90g icing sugar mixture
  • 4 tbs cornflour
  • 4 tbs cocoa powder
  • Zest of 1 orange
  • Cocoa powder, extra to dust
For the ganache:
  • 100g dark chocolate, chopped, or choc bit
  • 50g butter, chopped and softened – not melted
  • 5 tbs Nutella (or similar hazelnut spread)
  • Zest of 1/2 an orange
  • 1/2 tsp sea salt
Preheat the oven to 160c. Line 3 baking trays with baking paper, and set aside. Using a stand mixer or electic beater, beat butter until pale and creamy. Add the flour, icing sugar mixture, cornflour, cocoa powder, orange zest and a pinch of salt, and stir with a wooden spoon until well combined. Using clean hands, roll small teaspoons of the dough into balls, and place on the prepared trays (leave about 2cm in between each biscuit). With a fork dusted in cocoa powder, gently flatten the biscuit. Sprinkle each biscuit with a small amount of salt, and bake in preheated oven for 15 minutes. Remove from the oven and let cool for 15 minutes or until biscuits have hardened.
Biscuits
To make ganache, place chocolate in a microwavable bowl and microwave for 20-30 second increments. Each time the chocolate comes out of the microwave, stir as much as possible with a metal spoon to distribute the heat evenly – sometimes the chocolate looks as though it is not melted but will begin to melt when stirred. Doing this will prevent the chocolate burning and becoming gluggy. When chocolate is completely melted, set aside for 3 minutes. Add the 50g softened butter, nutella, orange zest and salt and mix until well combined.
Little poos
Assembly:
Pair up similar sized melting moment biscuits. To fill biscuits, you can use either a piping bag or a knife. To use a piping bag, spoon ganache into a piping bag fitted with a wide round nozzle. Sandwich together with remaining biscuit. Melting moments are best stored in an airtight container at room temperature, and are best consumed within 1-3 days. Yum!
000_0028

Nutella and Hazelnut Macarons

I have always been a huuuuge Nutella fan. I always sometimes eat it by spoonfuls out of the jar – but who doesn’t. It really is just way too good. I have had a couple of requests for hazelnut/Nutella macarons recently, so now that Uni has finished and I now have a life again, here they are!

I had seen hazelnut macarons before which only used Nutella as the filling, but I wanted to make them special and go that extra mile so I made a ganache. I used half milk choc and half dark choc, with both cream and nutella. It was delish, how could it not be? Plus, I also roasted some whole hazelnuts, crushed them and used them in the ganache, too. If you are a Nutella fan, it is pretty obvious you are going to lurrrrrrrrve these.

For some reason the shells were slightly extra puffy this time, they were probably my best looking shells yet 😉 You know that you have made a good macaron when you pipe the filling and the shell remains sturdy and doesn’t show any signs of crumbling to the ground, and when they are crunchy on the outside, and chewy and gooey in the middle. Yummmmmm!

Macarons:

This recipe is Adriano Zumbo’s, and was published a couple of years ago in the Herald Sun. You will definitely need kitchen scales to make macarons.

  • 135g almond meal
  • 135g icing sugar
  • 125g caster sugar
  • 45g egg whites
  • 50g egg whites
  • 40g water
  • good quality cocoa, to sprinkle

Preheat oven to 170c (160c fan forced). Spray four oven trays with cooking oil spray around the edges, and line with baking paper and set aside. Place almond meal and icing sugar in a large bowl, and sift together 3 times. Set aside, along with the 45g egg whites. Put 50g egg whites in a separate bowl. Heat caster sugar and water in a small saucepan until it is hot and syrupy (if it slightly burns my tongue, it’s done!). If white, really thick, powdery bubbles begin to form around the edges, start again!

Begin beating the 50g egg whites with one hand, and with the other, stream the hot sugar syrup down the side of the bowl to create an italian meringue. Beat until stiff peaks form, the meringue should be thick and very glossy. If you want to add flavouring/colouring, now’s your moment (for these I didn’t add any colouring or cocoa in the mixture, but you could add a bit of cocoa if you wanted). Pour meringue into the almond meal, icing sugar and 45g egg whites mixture and mix roughly to combine. When combined, fold mixture together (one single stroke) until there are no air bubbles left. Make a spread across the top of the mixture, and it should disappear in about 20 seconds. Spoon mixture into a piping bag fitted with a round nozzle. (If you don’t have a piping bag set, most supermarkets sell plastic ones, they are Multix brand, in an orange box and contain 5 piping bags with a few different nozzles, plus they’re only about $3. You should be able to find them in the baking aisle). Lock the bag by spinning the top around 4 times. Pipe 3-4cm rounds on the oven trays prepared earlier. Gently tap the bottom of the trays and let them sit for about half an hour, or until mixture is dry to the touch.

Place in oven and bake for 7 minutes. Turn tray around in the oven and bake for another 7 minutes. To test, pull a macaron off the baking paper. If it is stuck, keep cooking and checking regularly. Cool on trays for 5 minutes, then peel off and place on a wire rack. The mixture should make about 12-15 really large macarons, and about 25 smaller macarons. Macarons keep really well (about 5 days in the fridge) and some say that the longer they are refrigerated, the more the flavour is likely to develop. Macarons taste best when they are stored in the fridge, then brought down to room temperature to eat.

Hazelnut Ganache: (this great recipe was adapted from the great blog, Penguin Says Feed Me)

  • 110ml thickened cream (I used light thickened cream and the texture was still great)
  • 140g chocolate (I used half milk – Green and Blacks organic, half dark – Callebaut Couveture which my amazing boyfriend bought for me – it’s hugely expensive and I would never buy it myself, but it is fantastic, otherwise you could just use Green and Blacks or Old Gold/Club)
  • 2 generous tablespoons Nutella
  • 1 handful whole hazelnuts (probably about 10 nuts)

Place hazelnuts on an oven tray and roast for 10 minutes in an 150c, or 160c fan forced oven. Pour into mortar and crush with pestle, or just on a chopping board and chop them finely. Set aside. Place chocolate, cream and Nutella in a medium sized saucepan and cook over low-medium heat until melted. Pour into bowl and set aside until firm (I usually make ganache before macarons, then it is firm enough to be piped later on). You don’t need to refrigerate this ganache, but ensure you stir it every half an hour or so.

Assembly:

Pair up identical macaron shells. Spoon ganache into piping bag fitted with a round nozzle. Pipe half a teaspoon onto a shell, and top with the crushed hazelnuts, then pipe another half teaspoon, and sandwich with the other shell. Dust with cocoa.

If you are a hazelnut lover, you will be able to eat a whole bowl of this ganache, no worries! You could also top cupcakes, or make a hazelnut/chocolate layer cake, or even a tart, with this ganache. But macarons are always the best 😀

Happy Hazelnuts!