Chocolate Mudcake Layers, with Red Wine Ganache, Fresh Cherries and Hazelnut Praline

Happy New Year to you! I am back with a bang – with this bee-yoo-tiful chocolate mud cake with all the bells and whistles! I hope you all had a wonderful Christmas and New Year, and enjoyed the break with your loved ones. I know I certainly did, and am feeling refreshed and ready to attack 2015 head on!

000_0020
I must say, I am super proud of this cake. I knew exactly what I wanted it to look like, and I had all the flavours imagined in my mind. It turned out perfectly, and it was really delicious, if I say so myself. This cake was inspired by the fantastically awesome Katherine Sabbath. If you don’t know who she is, pretty please check out her Instagram – you will be amazed!
000_0014
The thing I loved most about this cake, apart from how it looked, was the combination of the dark chocolate red wine ganache, and the fresh cherries. The richness of the chocolate and the red wine together, with the hit of the juicy fresh cherries, full of flavour, was downright damned delicious. The cherries here in Australia at the moment are so yummy, and so cheap! Yay for Summer! If only it lasted all year long.
Chocolate Mud Cake Layers: (recipe by Janelle Bloom)
Makes 4 x 23cm layers
  • 400g butter
  • 200g good quality dark chocolate, chopped
  • 1/2 cup water
  • 1/2 cup good quality cocoa
  • 2 tbs good quality drinking chocolate or instant coffee powder, or 1 tbs of each if you want
  • 1 tsp vanilla bean paste/natural extract
  • 2 cups caster (white) sugar
  • 6 eggs, at room temperature
  • 1 1/2 cups self-raising flour, sifted
  • Approximately 500g fresh cherries, stones removed and halved
  • Approximately 30 fresh cherries, with stems (I used a 695g bag altogether, and it was just enough)

Preheat oven to 160c. Line 23cm springform cake tins with baking paper. I had two tins, therefore had to repeat the process.

In a medium saucepan, combine butter, chocolate, water, cocoa, drinking chocolate and/or coffee powder and vanilla. Cook over a medium heat, stirring constantly, until melted and smooth. Remove from heat, and set aside for 10 minutes or until lukewarm.

In the meantime, beat eggs and sugar together in a stand mixer, on medium speed, until pale and creamy. Stream the chocolate mixture down the side of the stand mixer to incorporate into egg mixture. Beat until well combined. Stop the mixer, and add the flour. Beat again until well combined and smooth.

Weigh mixture into four even portions (I did this with digitial scales), to ensure even layers. Pour mixture into prepared tins. Bake for 25 minutes in preheated oven, or until a skewer is inserted, and comes out clean. Repeat process, depending on how many cake tins you have.

Cool cakes for 15-20 minutes in tins, and transfer to a wire rack. If not using immediately, wrap tightly with cling film once cakes are completely cool, and refrigerate. Bring down to room temperature to assemble and eat.

Dark Chocolate and Red Wine Ganache:

  • 500g good quality dark chocolate, chopped
  • 2/3 cup thickened cream
  • 1/2 cup red wine, I used Shiraz

Place chocolate and cream in a medium saucepan, and cook, over a medium heat, stirring, until melted and smooth. Remove from heat, and slowly add red wine. Stir until well combined and mixture is thick (wine will hang at the top of the mixture, but keep stirring, as it may take a couple of minutes for it to be mixed in properly). Pour ganache into a heatproof bowl, cover in cling film, and refrigerate. If using ganache that day, you will need to wait until it is set to use it. It may be a good idea to make the ganache first. If using the next day, you will need to slightly warm ganache in the microwave, for 10 seconds only.

FYI – for best results, beat your ganache in the stand mixer before piping, especially if it has been in the fridge overnight and has been warmed in the microwave. It will make the ganache nice and fluffy, and will be much easier to pipe.

Hazelnut Praline:

  • 1 cup caster (white) sugar
  • 3 tbs water
  • 1/2 cup hazelnuts, roughly chopped

Line an oven tray with non-stick baking paper. Arrange hazelnuts neatly on the tray. Place sugar and water in a medium saucepan, and cook, on a low-medium heat, until sugar has completely dissolved. Then, turn heat up to high, and cook, stirring occasionally, until sugar mixture turns a deep golden colour. Pour sugar mixture over the hazelnuts, and leave to set and cool, which will take approximately 30 minutes. If not using praline immediately, break into pieces and store in an air-tight container, in the freezer. This will prevent the praline from becoming sticky.


000_0022

Assembly:

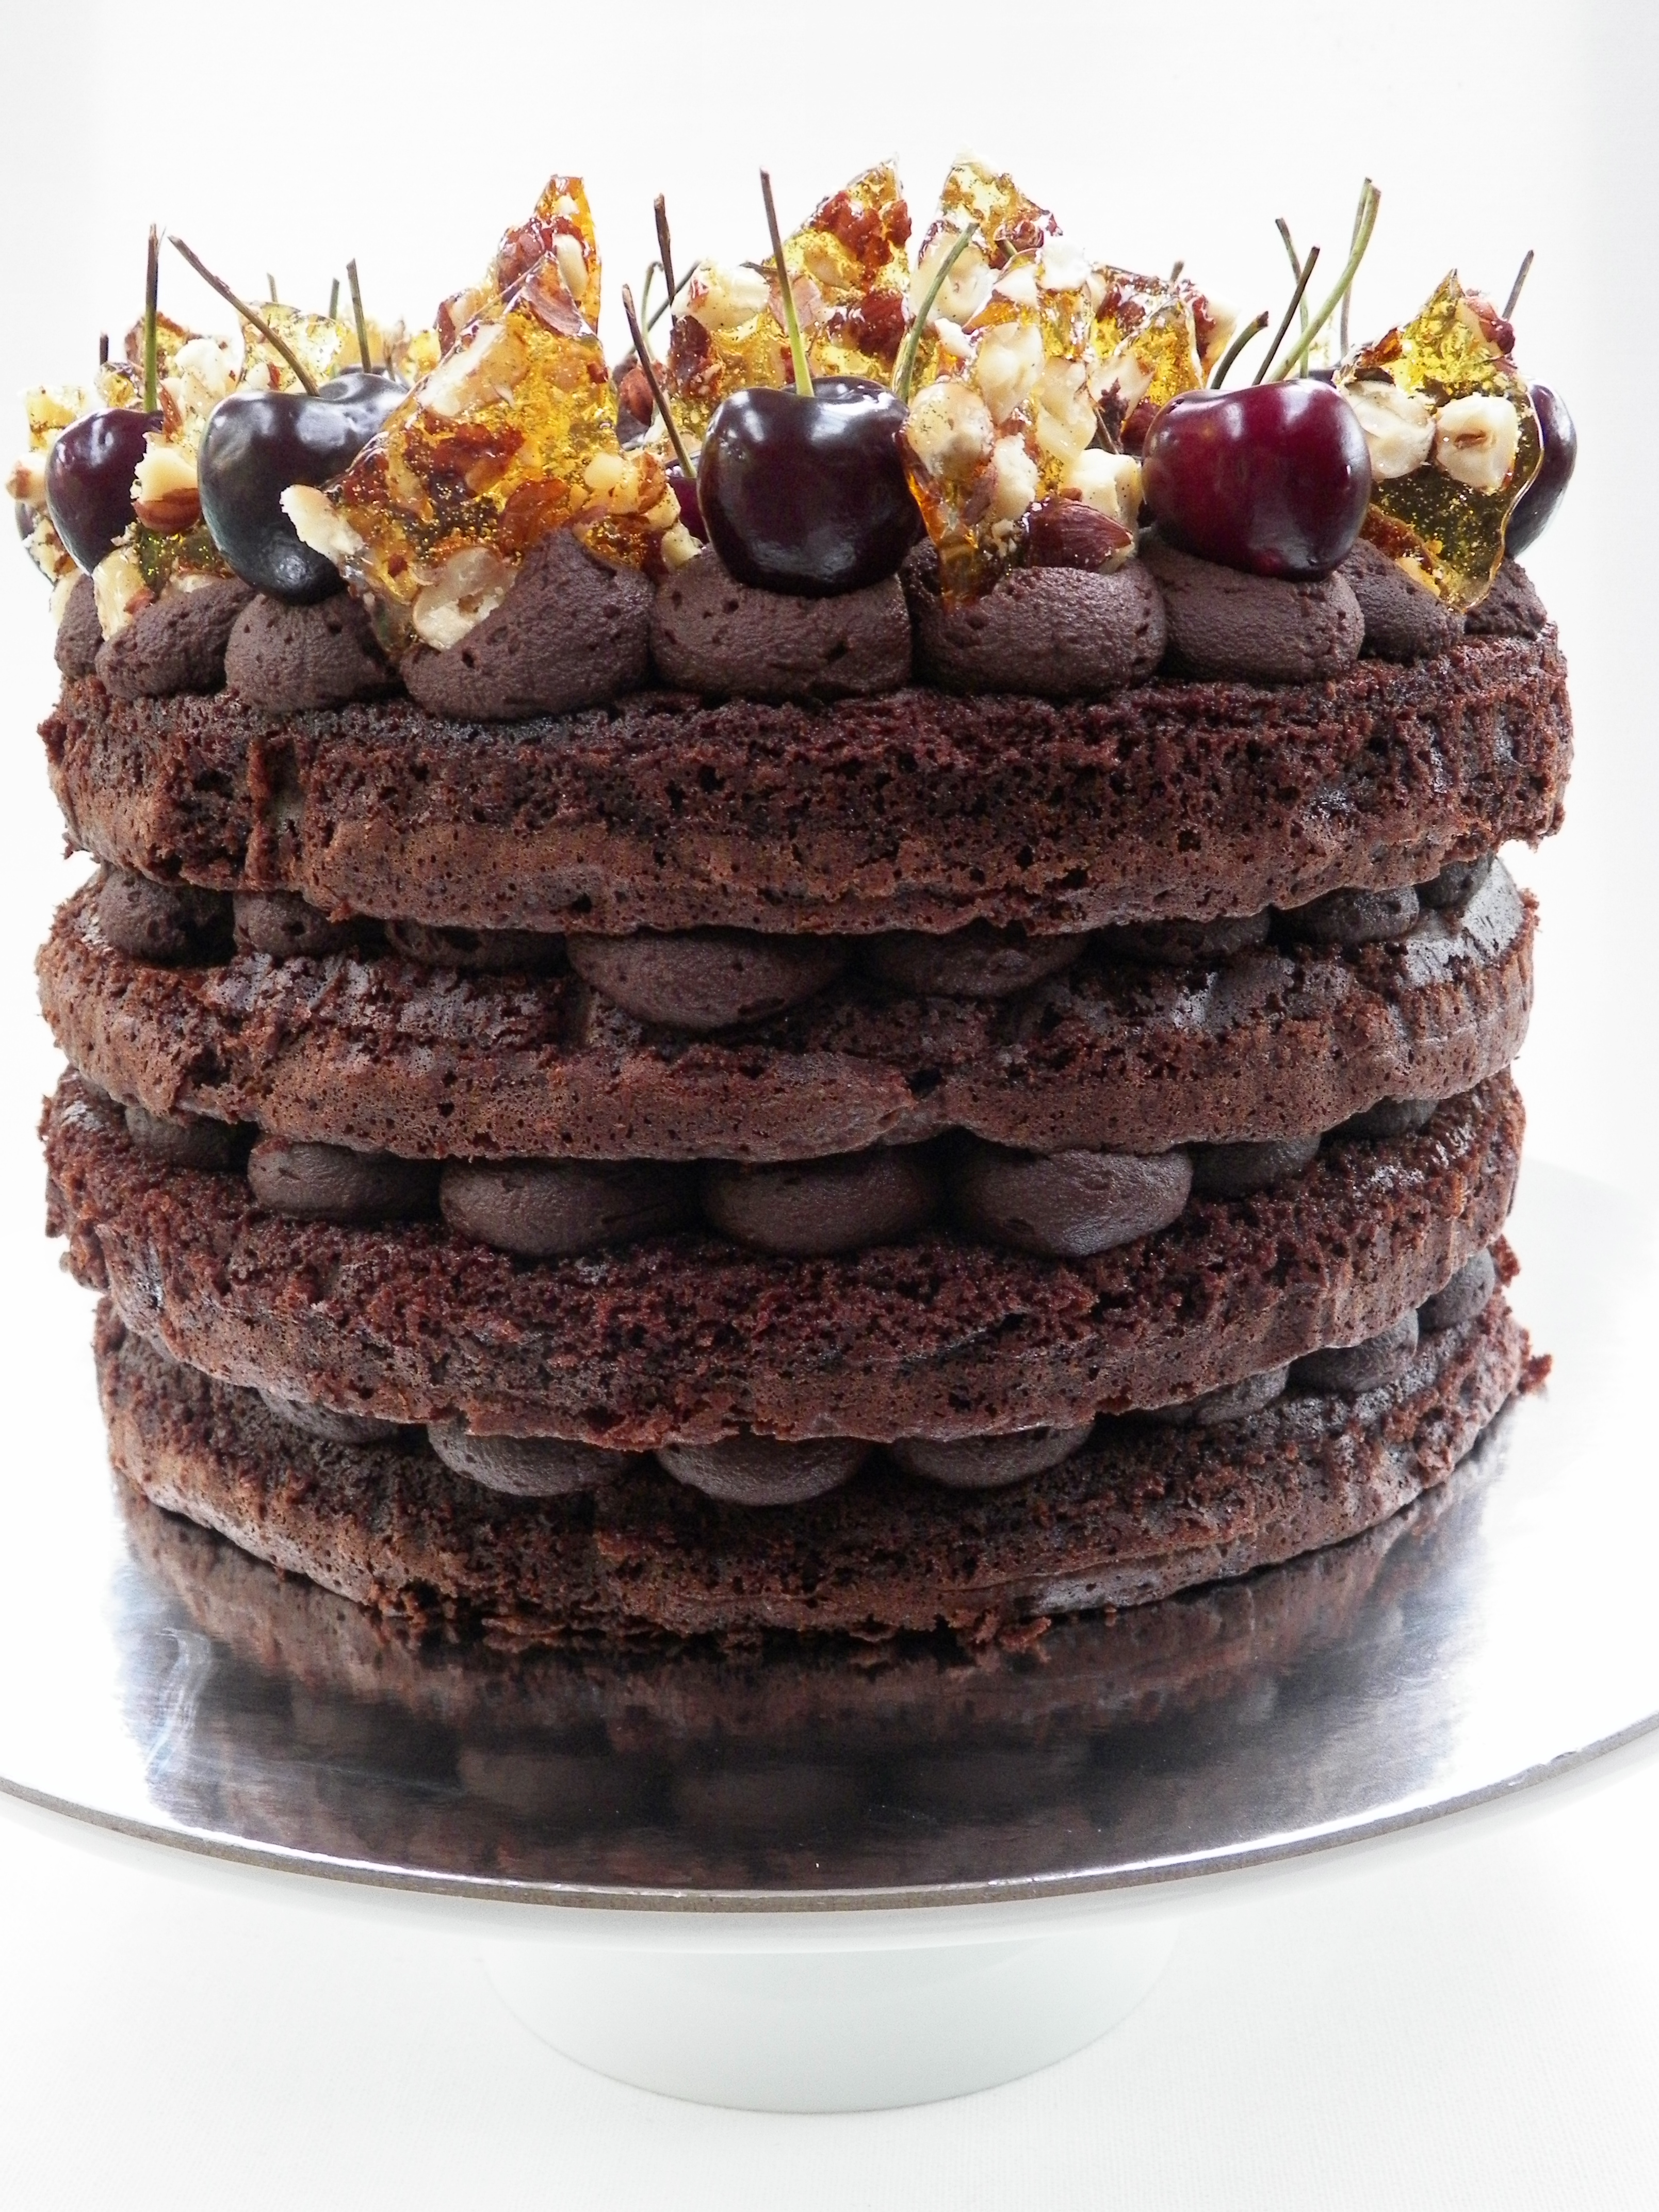
Spoon mixed ganache into a piping bag with a wide, round nozzle. Place one mud cake on a stand, board or plate. Pipe one round of ganache in the centre of the cake. Place cherries, cut side down, around ganache. Repeat process around the cherries with the ganache, and repeat again. It should go: ganache, cherries, ganache, cherries, ganache (see photo below). Repeat with the second and third layers of mud cake. For the final layer, the top of the cake, do the exact same thing with the ganache, but instead, place the whole cherries on this layer. In addition, place whole cherries on top of the ganache rounds on the edge, just to give the cake a bit more height. Trim the ends of the cherry stems if they are brown, with a pair of kitchen scissors. Arrange praline as desired. ENJOY! 🙂

Layer

This cake was made for my Dad and Nanna’s birthdays, and to see their faces light up when they saw this cake was wonderful, and then again when they tasted it. It really was a labour of love. I hope I get the opportunity to make this special cake again soon.

000_0016

Until next time…x

Follow @whiskitforabiscuit on Instagram here.

Salted Caramel Ice Cream with Peanut Praline

As I have said so many times before, I looooove anything to do with salt and caramel. And I love Ice Cream.

I got a proper Ice Cream churner for my 21st birthday a while ago and I had only used it once before, and my boyfriend has been begging me for a while now to put it to good use. So with some spare caramel I had in the fridge, here we are. And it was pretty awesome.

For the caramel, I used the Caramel Maison that I made for the Salted Butter Caramel Macarons. It worked really well, and the flavour was great. It took quite a while for the Ice Cream to be ready, but it was certainly worth the wait 🙂 I made a peanut praline to go with the ice cream, just to add a textural element I guess, but I also love anything to do with toffee, and pralines are so much fun to make. As soon as I made the praline though, I decided it would have been so much cooler with the addition of buttered popcorn. Oh well, next time!

Salted Caramel Ice Cream: (we adapted the recipe from the manual that came with the machine)

200g caramel maison, slowly warmed in the microwave until it reaches a pouring consistency (otherwise it will clump)
1 cup full cream milk, well chilled
500ml thickened (heavy) cream
1 tsp vanilla bean paste or vanilla extract
3/4 cup granulated sugar (we used white – not caster, it is not quite as fine as caster, although you probably could use it if it was all you had)

In a medium bowl, use a hand mixer or a whisk to combine the milk and sugar, until the sugar is dissolved (about 1-2 minutes on low speed). Stir in the cream and vanilla. If you have a churner (I have the Cuisinart ICE-20A), turn it on, pour mixture into freezer bowl and let mix until thickened. If you don’t have a machine, never fear! Check out this great how-to by the amazing David Lebovitz. Just use the same ingredients, but follow David’s method. TIP – make sure your chilled ingredients are super, super cold. And if you are using a churner like this one, make sure your freezer bowl is completely frozen – no sloshing of water, and take the freezer bowl out after you have assembled the machine and are completely ready to go.

Well, ours didn’t thicken. So, we left in in the churner for about an hour and then decided to put the whole thing in the freezer (which is what they recommend for optimum results). The next day, it was great!

Peanut Praline:

  • 1 handful of peanuts, I used unsalted but you could definitely use salted if you wanted
  • 1 cup caster (superfine) sugar (I only used half a cup here but realised I needed a lot more)

Line a baking tray with baking paper, and place down peanuts. Don’t spread them out too far, but you don’t want them to be too close together, either. Place the sugar in a shallow frying pan, and ensure it is evenly spread. Cook over medium heat. After a few minutes, sugar will start to bubble and darken around the edges of the pan. Once this happens, push the darkened sugar towards the centre of the pan. The rest of the sugar will begin to melt and darken as well.

Once all the sugar has darkened to a light brown colour, carefully pour it evenly over the nuts. If you like the burnt and bitter toffee flavour, you could definitely take the sugar a bit further. I did a horrible job of coating the nuts, but as I said earlier, I needed a lot more sugar. Leave to set, this will happen very quickly. Once praline is completely hard, cover with a layer of baking paper, and use a hammer or a meat tenderiser to break up the praline. If you want large shards, don’t break it up too much. If you want it completely crushed into tiny pieces, almost like a powder, it is best to blitz it in a food processor.

Churned ice cream definitely has a different consistency to store bought ice cream. Even though there was a lot of milk and cream in the recipe, it still had a slightly sorbet-y like texture which I really loved. Whilst it was quite sweet and filling, it wasn’t too heavy and overly creamy like so many ice creams from the shops.

To serve, we topped the ice cream with a little more of the caramel maison and a generous sprinkling of sea salt. And a few pieces of the praline, of course. I really recommend making your own ice cream if you have the time. You can do it without a machine, so don’t let the fact that you don’t have one put you off! You can make your own flavours and add your own colours, and I promise that if you find a great recipe, it will taste just as good, and will be so much cheaper than a tub of Ben and Jerry’s 🙂