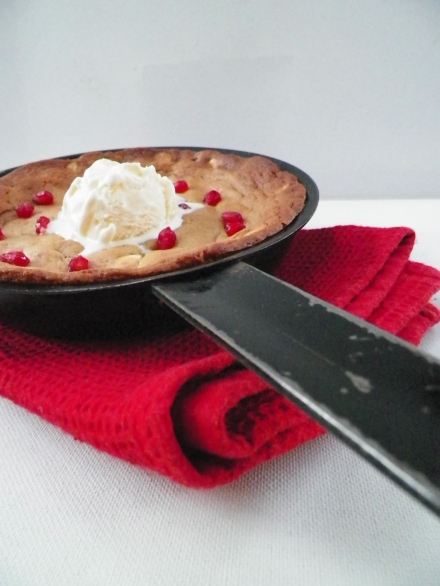
Pomegranate, Salted Caramel and White Chocolate Pan Cookie

Delicious. Is just what this delightful pan cookie was. I have been wanting to make one of these for a while now, and it certainly did not disappoint. Crispy on the outside, soft and gooey on the inside, plus the addition of creamy salted caramel = YUM!

000_0005

 The combination of the sweet white chocolate, salty caramel, and the fresh little pops of the pomegranate seeds were a really great mix together. However, I also made smaller cookies on their own, which were delicious, but very, very soft, due to the amount of salted caramel I added! This combination is perfect for a pan cookie, topped with more pomegranate and some ice cream. Plus, these are so easy to make, and are a great dessert to share, or not to share 😉

000_0006

 Pomegranate, Salted Caramel and White Chocolate Pan Cookie: 

Makes 1 pan cookie, and approximately 12 smaller cookies. You could halve this recipe for the pan cookie only.

  • 125g butter, chopped and softened, not melted
  • 1/2 cup brown sugar, tightly packed
  • 1/2 cup castor (white) sugar
  • ½ tsp vanilla bean paste/natural extract
  • 1 egg
  • 1 3/4  cup self-raising flour
  • Pinch of sea salt
  • 250g good quality white choc chips
  • 2 tbs salted caramel (I used a homemade one, but you could also use Dulce de Leche, Nestle Top ‘N’ Fill Caramel)
  • Seeds of ½ a pomegranate

Preheat the oven to 160c. Grease a small non-stick pan (I used a 17cm pan) with butter, and set aside. Beat the butter and sugar together until pale and creamy, approximately 3-4 minutes. Add the vanilla, and the eggs, one at a time until well combined. Stir in the flour with a wooden spoon, until completely mixed. Add the chocolate, salted caramel and pomegranate seeds, and mix well. Spoon mixture into prepared pan, filling it to the top, and smooth over mixture with a spoon. Place in pre-heated oven, and bake for 15-20 minutes, or until golden. Let cool for 5 minutes, and top with more pomegranate seeds and ice cream. Enjoy!

000_0004

FYI – you could easily use a bigger or smaller pan for this recipe, you would just need to adjust the cooking time, and keep an eye out for when the cookie is golden, or to your liking 🙂 Also, sorry for the crappy photos. I had to quickly snap away before the sun went down!

000_0008

Learning how to cook like a Parisian – an amazing experience at La Cuisine, Paris

When I was in Paris last year, I desperately wanted to do a cooking class, but as we were travelling for a long time on a tight budget, unfortunately, it just didn’t happen. However, I was very lucky to be going back to the city of love for a short visit this year, so there was no doubt in my mind that I would be doing a Parisian cooking class this time! I chose to do the class with La Cuisine as they had excellent reviews, and boy, am I glad I went with them! They really were fantastic. We chose to do the Market Class, where the group met at a local farmers market to choose the menu and buy the ingredients for the lunch. We then took a short stroll to the kitchen, in the hot Parisian summer sun, via the Notre Dame.
Fish
Fruit
Cheese
La Cuisine gave our group freedom to choose what we wanted to eat – there was no set menu. We chose sea bream for the main, and some ripe peaches and apricots for dessert, along with some beautiful cheeses, vegetables and baguettes.What I loved about the market was that our wonderful chef, Emilie, explained everything to us. She showed us what to look for when choosing fish, how to tell if fruit and vegetables are ripe, and gave us a thorough run down on different types of French cheeses and breads. One of the cheeses we had was a special cheddar type, where, in the process of making this cheese, little cheese mites (yes, little bugs!) huddle around the outside of the wheel, protecting the cheese from bacteria. Some people thought this was pretty disgusting, but I thought it was kind of cool that little bugs could help produce a delicious cheese! And delicious it was! (FYI – the mite cheese is the orangey one at the bottom).
Cheese2
When it was time to cook, everybody helped out and did their bit – it was certainly a team effort. Emilie showed us how to fillet a fish, which I did for the first time – it was a pretty horrible effort though, I pretty much hacked the poor thing to bits! Lucky I wasn’t the only filleting virgin. To go with the sea bream, we made a cauliflower puree, mini roasted carrots, onions and radishes and a buerre blanc sauce. This sauce was easily my favourite part of the whole lunch, and I could have drank a whole bowl of it. It was delicious – but let’s face it, anything with a truckload of butter, white wine and onions is bound to taste pretty damn good.
Main
For dessert, we made an almond and hazelnut financier, with roasted peaches and apricots and chantilly cream. This was a really delicious dessert. The peaches and apricots were sliced up, brushed with butter, and roasted with brown sugar and rosemary, an unexpectedly delicious addition. The financier was dense and buttery, and with the chantilly cream, it was really great. I am definitely looking forward to making this again.
Dessert
If you are going to Paris in the near future, and love food, I really recommend you check out ‘La Cuisine’. They have lots of other classes to do with pastry, bread, chicken and more. If I had the time, I would have loved to do a pastry or macaron class! Oh well, next time! Thanks to La Cuisine and Emilie, for an unforgettable day 🙂

Chocolate Passionfruit Macarons

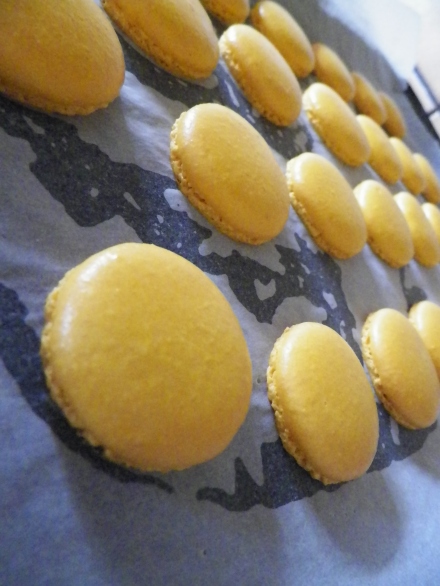
It seems I’m developing a bit of habit of combining chocolate and fruit lately. This macaron flavour was inspired, or recreated, I should say, from my visit to Paris last year, where I had the most amazing macarons, unsurprisingly. Pierre Herme had an amazing Chocolate Passionfruit macaron, and the middle was the yummiest combination of creamy and bitter chocolate combined with that zingy and sweet hit of passionfruit, it was delicious. I did my best to try and recreate this wonderful moment, and I think I did quite well, but of course, nothing will ever compare to Pierre Herme!

000_0007

The ganache didn’t go quite as I hoped it would, as I think I made it too late. Ganache can take a long time to set properly. Next time I would probably leave it overnight. Then, I put too much liquid into the butter, and it split. Luckily, that was easily fixed, with more butter. But there’s not much that butter can’t fix. The flavour of the ganache was very full on when I made it. It was very sour and the chocolate was very bitter – I used 75% cocoa, next time I would probably use really good quality milk or a regular dark chocolate. You couldn’t really distinguish the chocolate from the passionfruit, it was too strong. However, as macarons tend to do, the flavour did develop, and they were much nicer the next day. Also, I’m super happy with these shells! One giant positive of colder weather = less humidity, prettier macs 🙂 Oh, and FYI, I have slightly changed my macaron recipe. It’s only the cooking times, but I’ve found the shells to be sturdier and chubbier since I’ve made the change.

000_0010

Macarons:

This recipe is Adriano Zumbo’s, and was published a couple of years ago in the Herald Sun. You will definitely need kitchen scales to make macarons.

  • 135g almond meal
  • 135g icing sugar
  • 125g caster sugar
  • 45g egg whites
  • 50g egg whites
  • 40g water
  • 1/4 tsp colouring gel, yellow
  • 1/4 tsp colouring gel, orange

Spray four oven trays with cooking oil spray around the edges, and line with baking paper and set aside. Place almond meal and icing sugar in a large bowl, and sift together 3 times. Set aside, along with the 45g egg whites. Put 50g egg whites in a separate bowl. Heat caster sugar and water in a small saucepan, over a low-medium heat, until the sugar completely dissolves (if it slightly burns my tongue, it’s done!). If you do not want to burn your tongue, Zumbo suggests investing in a candy thermometer and heating the syrup until it reaches 118 degrees C (244 degrees F). If the syrup becomes thick and powdery in appearance, you will need to start again. This is because the sugar has been heated too much, too quickly, and instead of dissolving, it has cooked.

Begin beating the 50g egg whites with one hand, and with the other, stream the hot sugar syrup down the side of the bowl to create an italian meringue. Beat until stiff peaks form, the meringue should be thick and very glossy. If you want to add flavouring/colouring, now’s your moment. So add the colouring now. Just lightly beat it into the meringue. Pour meringue into the almond meal, icing sugar and 45g egg whites mixture and mix roughly to combine. When combined, fold mixture together (one single stroke) until there are no air bubbles left. Make a spread across the top of the mixture, and it should disappear in about 20 seconds. Spoon mixture into a piping bag fitted with a round nozzle. (If you don’t have a piping bag set, most supermarkets sell plastic ones, they are Multix brand, in an orange box and contain 5 piping bags with a few different nozzles, plus they’re only about $3. You should be able to find them in the baking aisle). Lock the bag by spinning the top around 4 times. Pipe 3-4cm rounds on the oven trays prepared earlier. Tap the bottom of the trays on the kitchen bench and let them sit for about half an hour, or until mixture is dry to the touch. Meanwhile, preheat the oven to 135c, fan forced.

000_0002

Place in oven and bake for 8 minutes. Turn trays around, and bake for another 9 minutes. To check if shells are cooked, gently lift one off the baking paper. If it peels of easily, they are done, if not, keep checking at 2 minute intervals. Cool on trays for 5 minutes, then peel off and place on a wire rack. The mixture should make about 12 -15 large macarons, and about 25 smaller macarons. Macarons keep really well (about 5 days in the fridge) and some say that the longer they are refrigerated, the more the flavour is likely to develop. Macarons taste best when they are stored in the fridge, then brought down to room temperature to eat.
000_0004

Chocolate Passionfruit Ganache:

  • 100g good quality chocolate, dark or milk, depends how strong you like your chocolate
  • 170ml thickened cream
  • 170g can passionfruit pulp, strained from seeds OR depending on size, 4-5 passionfruits, strained of seeds

Place all ingredients in a medium saucepan, and stir over a low-medium heat until smooth. Pour into bowl and refrigerate. For best results, make ganache the day before serving. Ganache should be of a pipe-able consistency. OPTIONAL – if you like your ganache quite creamy, feel free to beat up 70g butter and add to ganache.

000_0011

Assembly:

Pair up likely macaron shells. Spoon ganache into a piping bag fitted with a wide round nozzle. Pipe rounds onto shells, and sandwich with another. You can dust with cocoa, if you like. Store macarons in an airtight container, in the fridge, and bring down to room temperature to eat.

Happy Baking! 🙂


Coconut and Lime Ombre Cake

Happy slightly belated New Year to you all! I can’t believe it is 2014, and January the 1st marked whiskitforabiscuit’s second birthday. Yay 🙂 The beginning of the year is always a bit of a baking whirlwind for me, because almost every member of my family has their birthday in January. So, here is the first of the birthday cakes:

CoconutLimeCake

I love the combination of coconut and lime. It’s really fresh and summery, which is nice when you’re in the middle of the horrible heatwave Melbourne is experience at the moment! The last thing you feel like doing is forcing down a piece of heavy mud cake down your pie hole, so this cake, I thought, was ideal.

000_0007

As you may have seen, I enjoy making layer cakes with different colours and gradients; it just makes it a bit more fun, especially when kids are around. I also decided, instead of covering and filling the cake in buttercream, I used a fresh and tangy lime curd to sandwich the layers, and whipped cream to cover the cake, with some coconut, too. Buttercream does not go down well in heat!

Layers

For the cake, I used my trust vanilla cake recipe I have used many times before (which is originally a cupcake recipe, but it works just as well for larger cakes), and just added a bunch of lime zest, lime juice and coconut. It’s so easy and it works perfectly every time, especially when adding different flavourings. I only had a couple of hours to make this cake, so the layers are not quite as even as I’d like them to be. Oh well, it still tasted pretty awesome!

000_0003

I hope you all had an amazing New Year, and that 2014 is everything you wish it to be! Happy Baking 🙂

Raspberry Buttercream Macarons

My love for raspberry is certainly well documented, and this addition is no exception!

I thought it would be nice to do something non chocolate or caramel for a change! I made a simple buttercream, and just added some raspberries that I cooked down and it worked really well. The flavour was great and I love the natural pink colour it gives. I also put half a raspberry in the middle of each macaron because I thought it would break up the buttercream and add a nice tang 😉

Macarons:

This recipe is Adriano Zumbo’s, and was published a couple of years ago in the Herald Sun. You will definitely need kitchen scales to make macarons.

  • 135g almond meal
  • 135g icing sugar
  • 125g caster sugar
  • 45g egg whites
  • 50g egg whites
  • 40g water
  • 1/4 tsp Wilton’s pink colouring gel

Preheat oven to 170c (160c fan forced). Spray four oven trays with cooking oil spray baround the edges, and line with baking paper and set aside. Place almond meal and icing sugar in a large bowl, and sift together 3 times. Set aside, along with the 45g egg whites. Put 50g egg whites in a separate bowl. Heat caster sugar and water in a small saucepan, over a low-medium heat, until the sugar completely dissolves (if it slightly burns my tongue, it’s done!). If you do not want to burn your tongue, Zumbo suggests investing in a candy thermometer and heating the syrup until it reaches 118 degrees C (244 degrees F). If the syrup becomes thick and powdery in appearance, you will need to start again. This is because the sugar has been heated too much, too quickly, and instead of dissolving, it has cooked.

Begin beating the 50g egg whites with one hand, and with the other, stream the hot sugar syrup down the side of the bowl to create an italian meringue. Beat until stiff peaks form, the meringue should be thick and very glossy. If you want to add flavouring/colouring, now’s your moment. So add the colouring now. Just lightly beat them into the meringue. Pour meringue into the almond meal, icing sugar and 45g egg whites mixture and mix roughly to combine. When combined, fold mixture together (one single stroke) until there are no air bubbles left. Make a spread across the top of the mixture, and it should disappear in about 20 seconds. Spoon mixture into a piping bag fitted with a round nozzle. (If you don’t have a piping bag set, most supermarkets sell plastic ones, they are Multix brand, in an orange box and contain 5 piping bags with a few different nozzles, plus they’re only about $3. You should be able to find them in the baking aisle). Lock the bag by spinning the top around 4 times. Pipe 3-4cm rounds on the oven trays prepared earlier. Tap the bottom of the trays on the kitchen bench and let them sit for about half an hour, or until mixture is dry to the touch.

Place in oven and bake for 8 minutes. Turn tray around in the oven and bake for another 7 minutes. To test, pull a macaron off the baking paper. If it is stuck, keep cooking and checking regularly. Cool on trays for 5 minutes, then peel off and place on a wire rack. The mixture should make about 12 -15 large macarons, and about 25 smaller macarons. Macarons keep really well (about 5 days in the fridge) and some say that the longer they are refrigerated, the more the flavour is likely to develop. Macarons taste best when they are stored in the fridge, then brought down to room temperature to eat.


Raspberry Buttercream:

  • 2/3 cup raspberries, fresh or frozen
  • 175g butter, chopped and softened
  • 1 1/4 cups icing sugar mixture

Place raspberries in medium saucepan with a splash of water. Cook over a low heat for about 10 minutes until raspberries are cooked down enough to pass through a sieve. Push raspberries through a fine sieve to get rid of the seeds. Let mixture cool completely.

Beat butter on high until pale and creamy. Gradually add the icing sugar and raspberry mixture. If not using immediately, refrigerate.

Assembly:

Match likely pairs of macaron shells. Fill a piping bag fitted with a star nozzle, and pipe a small round on a shell. With the left over raspberries, cut each berry in half and place on top of the buttercream. Pipe another small swirl on top, and sandwich with the other shell.

These macarons are also a part of this month’s Mactweets Challenge which are showcasing seasonal fruit. Seeing as raspberries are one of my favourite fruits and they are slowly coming into season in Australia, I thought they would be my best bet!