Cherry Ripe Layer Cake

Happy New Year! I hope you all had a wonderful Christmas and New Year, and managed to relax over the holiday season. I can’t believe the best time of the year is over already, it always goes too quickly! Usually, for me, January is a busy month for cakes, with most of my families’ birthdays. This year, however, almost my whole family were sick, and celebrations kept getting put off! So, this beauty of a cake was made for three peoples’ birthday, and delicious it was. Excuse the crappy photos, my awesome proper camera broke, and my the photos from my phone just aren’t the same 😦

CherryRipeCake

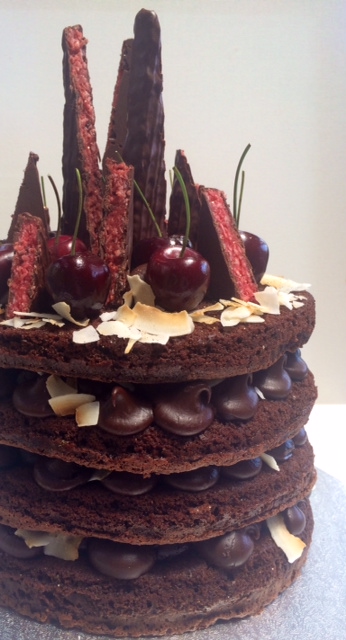
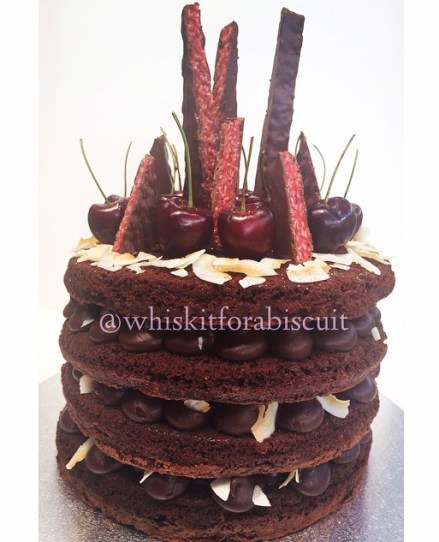
This cake is quite similar to this one I made about the same time last year, with red wine ganache. However, I omitted the red wine this year, and added toasted coconut flakes and cherry ripe bars.

CherryRipeCake1

Chocolate Mud Cake Layers: (recipe by Janelle Bloom)

Makes 4 x 23cm layers

400g butter
200g good quality dark chocolate, chopped
1/2 cup water
1/2 cup good quality cocoa
2 tbs good quality drinking chocolate or instant coffee powder, or 1 tbs of each if you want
1 tsp vanilla bean paste/natural extract
2 cups caster (white) sugar
6 eggs, at room temperature
1 1/2 cups self-raising flour, sifted
Approximately 500g fresh cherries, stones removed and halved
Approximately 30 fresh cherries, with stems (I used a 695g bag altogether, and it was just enough)

Preheat oven to 160c. Line 23cm springform cake tins with baking paper. I had two tins, therefore had to repeat the process.

In a medium saucepan, combine butter, chocolate, water, cocoa, drinking chocolate and/or coffee powder and vanilla. Cook over a medium heat, stirring constantly, until melted and smooth. Remove from heat, and set aside for 10 minutes or until lukewarm.

In the meantime, beat eggs and sugar together in a stand mixer, on medium speed, until pale and creamy. Stream the chocolate mixture down the side of the stand mixer to incorporate into egg mixture. Beat until well combined. Stop the mixer, and add the flour. Beat again until well combined and smooth.

Weigh mixture into four even portions (I did this with digitial scales), to ensure even layers. Pour mixture into prepared tins. Bake for 25 minutes in preheated oven, or until a skewer is inserted, and comes out clean. Repeat process, depending on how many cake tins you have.

Cool cakes for 15-20 minutes in tins, and transfer to a wire rack. If not using immediately, wrap tightly with cling film once cakes are completely cool, and refrigerate. Bring down to room temperature to assemble and eat.

CherryRipeCake2

Dark chocolate ganache: (you will need to make the ganache the day before serving the cake)

· 300g good quality dark chocolate, chopped, or choc bits
· 300ml thickened cream

In a medium saucepan, combine the chocolate and cream, and place over a low-medium heat, constantly stirring until melted. Place in a large bowl and let cool at room temperature. When ganache has cooled, cover with cling wrap and leave overnight at room temperature.

Assembly:

· Toasted coconut flakes or dessicated coconut
· 900g cherries, pitted and halved
· 100g whole cherries

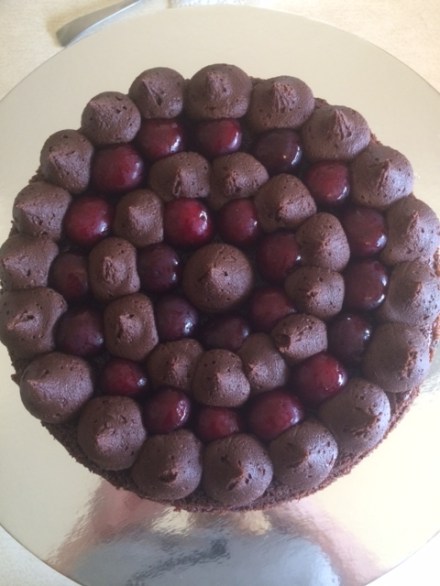
Place one layer of mud cake on the stand/base. Place ganache in a piping bag fitted with a large round nozzle. Pipe one small dob of ganache in the middle of the cake, and place halves of cherries around it. Repeat the process with ganache around the other side of the cherries, and repeat again. Sprinkle with coconut. The end result should look like this:

CherryRipeCake4

Repeat the process three times, until you reach the top layer. You can really decorate the top layer however you want. I used the ganache for the middle of the top layer, and as you can, sprinkled coconut around the edges. I stuck the whole cherries in with the ganache, to ensure they weren’t going to fall off. I sliced the cherry ripes into sharp triangles, to look effective on the cake.

CherryRipeCake3

Enjoy, and happy baking! X

Coconut and Lime Ombre Cake

Happy slightly belated New Year to you all! I can’t believe it is 2014, and January the 1st marked whiskitforabiscuit’s second birthday. Yay 🙂 The beginning of the year is always a bit of a baking whirlwind for me, because almost every member of my family has their birthday in January. So, here is the first of the birthday cakes:

CoconutLimeCake

I love the combination of coconut and lime. It’s really fresh and summery, which is nice when you’re in the middle of the horrible heatwave Melbourne is experience at the moment! The last thing you feel like doing is forcing down a piece of heavy mud cake down your pie hole, so this cake, I thought, was ideal.

000_0007

As you may have seen, I enjoy making layer cakes with different colours and gradients; it just makes it a bit more fun, especially when kids are around. I also decided, instead of covering and filling the cake in buttercream, I used a fresh and tangy lime curd to sandwich the layers, and whipped cream to cover the cake, with some coconut, too. Buttercream does not go down well in heat!

Layers

For the cake, I used my trust vanilla cake recipe I have used many times before (which is originally a cupcake recipe, but it works just as well for larger cakes), and just added a bunch of lime zest, lime juice and coconut. It’s so easy and it works perfectly every time, especially when adding different flavourings. I only had a couple of hours to make this cake, so the layers are not quite as even as I’d like them to be. Oh well, it still tasted pretty awesome!

000_0003

I hope you all had an amazing New Year, and that 2014 is everything you wish it to be! Happy Baking 🙂

Lamington Macarons

This is my second attempt at Lamington macarons. If you are unfamiliar with lamingtons, they are a delicious Australian treat – a vanilla cake that often has rapberry jam in the middle, and is rolled in chocolate sauce and covered in coconut. Sounds pretty good hey?! Thankfully this time, they actually do look like macarons, instead of pancakes (see Vegemite macarons)! I love the idea of using a flavour or a product that is completely non-macaron related, and making a macaron with these flavours and products in mind. That is the great thing about macarons – they are a blank canvas. You can colour them however you like and you can fill them with whatever flavour you like whether it be fruity, creamy or rich and chocolatey like this one.

I love the dark chocolate and raspberry combination, and with the addition of coconut, these macarons were so rich, hence why they are teeny tiny! This is also the first time I have made proper chocolate shells, and with a little tweaking with the recipe, they mostly turned out well. The chocolate shells were like mini mud-cakes with a meringue crust – so good. They were a lot denser than a normal shell, but were still airy and carried the chocolate flavour really well.

Chocolate Macarons: (this recipe is adapted from Adriano Zumbo’s book and is a bit different to the recipe I usually use)

You definitely need kitchen scales (preferably digital) to make macarons.

  • 135g almond meal
  • 135g icing sugar
  • 30g cocoa
  • 55g egg whites, x2
  • 150g caster sugar
  • 45g water

Grease and line 4 oven trays with baking paper, and preheat the oven to 160c. Place one lot of 55g egg whites in a large, dry and clean bowl and set aside. Sift together the almond meal, icing sugar and cocoa four times, and set aside, along with the other lot of 55g egg whites (I usually place egg whites in a ramekin, on top of a paper towel in the bowl with the dry ingredients – otherwise I tend to forget them :P). Combine the caster sugar and water in a small saucepan over a low heat. Stir until sugar is dissolved and syrup is hot – keep testing with your tongue until sugar is dissolved. Begin beating 55g egg whites in the large bowl, and slowly pour the sugar syrup down the side of the bowl. This will create an Italian meringue. Beat until soft peaks form – you do not want to overbeat your egg whites. The mixture should be thick and very glossy.

Pour the 55g egg whites in the ramekin into the dry ingredients. Carefully spoon the Italian meringue mixture into the dry ingredients bowl and stir to combine. Once combined, fold mixture (one single stroke) until there are no air bubbles left – this will usually take 30-40 seconds if you are folding non-stop. Make a spread with the spoon on top of the mixture, and it should subside in 15-20 seconds.

Using a piping bag fitted with a round nozzle, fill the bag 2/3 way with the macaron mixture (TIP – if you do not have a piping bag set, never fear. In the baking aisle of most Australian supermarkets you will find a small orange box – they are ‘Multix’ brand and have 5 piping bags and 5 piping tips. I am sure most supermarkets in the USA would have a very similar product). To lock the bag, spin the top around 4 times. Gently pipe small circles onto prepared baking trays. When you have a finished a tray, tap it hard against the bench – this will get rid of the air bubbles. Leave trays for about half an hour, or until they are dry to the touch and a crust is formed. You need this crust for the macarons to rise properly so that they form their little feet.

I had a bit of trouble with this next part. I’m not sure if it was my oven or the difference of having the cocoa in the shell mixture, but quite a lot of my shells cracked, especially around the edges of the tray. I found that these chocolate shells cook a lot quicker than regular shells, so this is what I did and most of them turned out pretty well. Only cook one tray at a time. Place tray in preheated oven for 7 minutes. Turn tray around and bake for 3 minutes. You may need to check early on in the cooking process whether you shells are forming properly or they are cracking. If they are cracking, I would recommend removing them from the oven and cooling them down, as they may already be cooked. If not, follow the times I have suggested. Let shells cool on trays for 5-10 minutes, then remove and place on a wire rack. Repeat process with remaining trays.

Chocolate Ganache:

This is a basic chocolate ganache. I have doubled the recipe I usually use.

  • 200g chocolate (I used half milk, half dark), chopped
  • 1 cup cream (doesn’t really matter which type but I use thickened or lite thickened)

Place chocolate and cream in a saucepan over a low-medium heat. Constantly stir with a metal spoon until completely melted. Pour into container/bowl/whatever and refrigerate until firm enough to pipe. I often make this ganache the day before and take it out of the fridge in the morning. Sometimes it may need 5-10 seconds in the microwave.

Assembly:

Match up likely pairs of macaron shells. Fill one piping bag with chocolate ganache and another piping bag with raspberry jam – I didn’t make mine this time, but if you want to, check out this awesome recipe by Matt Preston. Pipe a small dollop of ganache on the shell, pipe an even smaller dollop of jam on top, and then another dollop of ganache to encase the jam. Sandwich with another shell and gently sprinkle around the edges of the macaron with dessicated coconut.