Choc-Mint Candy Cane Macarons

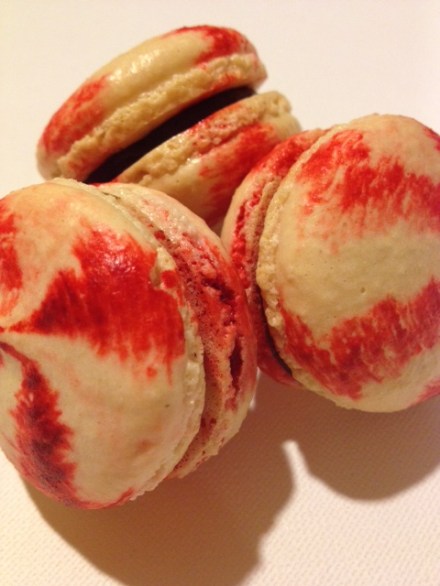
I do love the combination of chocolate and peppermint. Bittersweet dark chocolate with a cool minty kick made these macarons quite the tasty ones. They were somewhat a tribute to the humble candy cane, which is definitely one of my favourite Christmas treats. I realllly wanted to make these macarons into a candy cane shape, but it didn’t work for me this time 😦 I overcooked the shells for one, and piped them all the same way – which was fine until I needed to sandwich them together…silly! I think I will try it again though, now that I know what not to do. I’d love to try some gingerbread men shapes as well, but knowing my luck they would turn out like lumpy pancake men. Yum!

Follow me on Instagram - GemmaAsh

Macarons:

This recipe is Adriano Zumbo’s, and was published a couple of years ago in the Herald Sun. You will definitely need kitchen scales to make macarons.

  • 135g almond meal
  • 135g icing sugar
  • 125g caster sugar
  • 45g egg whites
  • 50g egg whites
  • 40g water
  • Wilton’s colouring gel, Red (I used ‘Rojo Intenso’)

Preheat oven to 170c (160c fan forced). Spray four oven trays with cooking oil spray baround the edges, and line with baking paper and set aside. Place almond meal and icing sugar in a large bowl, and sift together 3 times. Set aside, along with the 45g egg whites. Put 50g egg whites in a separate bowl. Heat caster sugar and water in a small saucepan, over a low-medium heat, until the sugar completely dissolves (if it slightly burns my tongue, it’s done!). If you do not want to burn your tongue, Zumbo suggests investing in a candy thermometer and heating the syrup until it reaches 118 degrees C (244 degrees F). If the syrup becomes thick and powdery in appearance, you will need to start again. This is because the sugar has been heated too much, too quickly, and instead of dissolving, it has cooked.

Begin beating the 50g egg whites with one hand, and with the other, stream the hot sugar syrup down the side of the bowl to create an italian meringue. Beat until stiff peaks form, the meringue should be thick and very glossy. If you want to add flavouring/colouring, now’s your moment. So add the cocoa now. Just lightly beat them into the meringue. Pour meringue into the almond meal, icing sugar and 45g egg whites mixture and mix roughly to combine. When combined, fold mixture together (one single stroke) until there are no air bubbles left. Make a spread across the top of the mixture, and it should disappear in about 20 seconds. With a skewer or a cake tester, spread 3 or 4 lines of the colouring along the sides of the bag. Spoon mixture into the piping bag fitted with a round nozzle. (If you don’t have a piping bag set, most supermarkets sell plastic ones, they are Multix brand, in an orange box and contain 5 piping bags with a few different nozzles, plus they’re only about $3. You should be able to find them in the baking aisle). Lock the bag by spinning the top around 4 times. Pipe 3-4cm rounds on the oven trays prepared earlier. Tap the bottom of the trays on the kitchen bench and let them sit for about half an hour, or until mixture is dry to the touch.

This is how it's done!

Place in oven and bake for 8 minutes. Turn tray around in the oven and bake for another 7 minutes. To test, pull a macaron off the baking paper. If it is stuck, keep cooking and checking regularly. Cool on trays for 5 minutes, then peel off and place on a wire rack. The mixture should make about 12 -15 large macarons, and about 25 smaller macarons. Macarons keep really well (about 5 days in the fridge) and some say that the longer they are refrigerated, the more the flavour is likely to develop. Macarons taste best when they are stored in the fridge, then brought down to room temperature to eat.

Yum!

Choc-Mint Ganache:

  • 100g good quality dark chocolate (I use Green and Black’s 70%)
  • 1/2 thickened cream
  • 1/2 tsp natural peppermint extract (available from most supermarkets)

Place chocolate and cream in a small saucepan over medium heat. Stir with metal spoon until melted. Stir in the peppermint extract. Pour into bowl and let cool. Refrigerate until firm enough to pipe or until when you need to use. If you are leaving the ganache in the fridge overnight, it may need 10 seconds in the microwave to be pliable enough to pipe.

Candy cane goodness...

To assemble, match up likely macaron pairs. Spoon ganache into a piping bag fitted with a round nozzle, and pipe small rounds of ganache onto a shell, then sandwich with another. Yum!

Deliciously Christmassy!

I hope everyone is enjoying the Christmas season so far, I cannot believe how quickly it has come! I think the best part of this time of the year is definitely the food, surprise, surprise! Although, it’s a scary reminder of how much I have to cook and bake before next Tuesday – luckily most of my shopping is done!

Happy Baking 🙂 X

Melted Snowmen Shortbread

Wow. What a crazy busy few weeks it has been! I cannot believe I haven’t baked anything Christmassy until now, I had so much planned to do in the last couple of weeks, but I always seem to be way too ambitious when Christmas baking is concerned. So, here we are – shortbread on the 13th of December! They are certianly no culinary masterpieces, but it is great shortbread though, even if I say so myself. And they are quite cute. And this is exactly what would happen if we could make snowmen at Christmas in Australia.

Follow me on Instagram - GemmaAsh

Homemade shortbread has always been one of my favourites around Christmas time, and this is actually the first time I have properly made it myself (you can probably tell – they are far from consistent!). I used a Taste.com recipe, surprise, surprise, and it was awesome – really buttery and melted in your mouth. One of the things I love about shortbread is that it is sooo easy to make. It has 5 ingredients that would usually be in your pantry anyway. The dough is pretty tasty, too. Tasty enough that we probably lost a snowman or two due to my severe lack of self-control when it comes to dough.

Yummy

Shortbread: (recipe adapted from Taste.com) Makes 18 large snowmen.

  • 250g butter, chopped and softened
  • 1 cup icing sugar
  • 1/2 vanilla bean paste or vanilla extract
  • 2 cups plain flour
  • 1/2 cup cornflour

Preheat oven to 160c. Line 3 oven trays with baking paper. Beat butter, icing sugar and vanilla until pale and creamy. Add the flours and stir to combine. Turn the dough out onto a floured surface, and knead until smooth. If you find the dough too sticky, just add a bit more flour when kneading. Wrap the dough tightly in cling wrap, and refrigerate for 20 minutes.

Cut dough in half, and roll out with a rolling pin between two sheets of baking paper, until the dough is about 1-1/2cm thick. With a ring mould, or a round cookie cutter, cut circles out from the dough and place them on the baking trays. Cook for 20-25 minutes. The shortbread should not be too ‘blonde’ as they would say on Masterchef! I tried to take mine out just as they were beginning to go a tiny bit golden. Let cool on trays for 15-20 minutes.

Shortbread!

Turning the shortbread into Melted Snowmen:

  • 18 white marshmallows
  • Silver cachous
  • Orange sprinkles
  • Icing sugar
  • Lemon juice
  • Water
  • Vanilla bean paste
  • Edible black pen (these are fantastic, I bought mine from Baking Pleasures)

To be honest, I didn’t measure out the ingredients in the icing. I used a small-medium bowl, and started off with approx. 1/2 cup icing sugar, and probably 2 tsp of water. Mix the sugar and water together, then add the vanilla and lemon juice. It needs to be fairly thick, but still spreadable enough to move around on the shortbread. It should be this consistency. and should be well balanced with vanilla and lemon 🙂 This icing dries really quickly, so keep giving a stir every now and then.

Like this...

Draw faces on the marshmallows, I made them sad and confused, as they had just endured a serious heatwave!


Place a wire rack on top of some paper towel. Pour a teaspoon of icing onto the shortbread, and spread out to make it look as though the icing is dripping off the sides. Place a marshmallow on the shortbread, and 2 or 3 silver cachous in front if the marshmallow. Push an orange sprinkle into the marshmallow for the nose. Yum!

Heatwave...

These cute, sad little snowmen are great for the kids to make. They are really easy and fun to decorate 🙂 Plus, the shortbread tastes really good, too. Enjoy, and stay tuned for some more Christmas baking goodness 🙂 X


Jaffa Swirl Macarons

I have made Jaffa macarons probably close to 10 times, but have somehow never managed to get them up on here! They are definitely a hit with young and old, hence why have made them countless times! This time, however, I wanted to do something a little different. I have seen the swirly effect on macarons before, and always thought it would be really difficult to pull off, but surprisingly, it wasn’t too bad 🙂 I was really, really happy with how the colour turned out, and will definitely be giving this technique a go again! Also, apologies for the lack of quality photos – I have been having some camera issues, so iPhone it is for now!

Follow me on Instagram - GemmaAsh

Macarons:

This recipe is Adriano Zumbo’s, and was published a couple of years ago in the Herald Sun. You will definitely need kitchen scales to make macarons.

  • 135g almond meal
  • 135g icing sugar
  • 125g caster sugar
  • 45g egg whites
  • 50g egg whites
  • 40g water
  • Wilton’s colouring gel, orange

Preheat oven to 170c (160c fan forced). Spray four oven trays with cooking oil spray baround the edges, and line with baking paper and set aside. Place almond meal and icing sugar in a large bowl, and sift together 3 times. Set aside, along with the 45g egg whites. Put 50g egg whites in a separate bowl. Heat caster sugar and water in a small saucepan, over a low-medium heat, until the sugar completely dissolves (if it slightly burns my tongue, it’s done!). If you do not want to burn your tongue, Zumbo suggests investing in a candy thermometer and heating the syrup until it reaches 118 degrees C (244 degrees F). If the syrup becomes thick and powdery in appearance, you will need to start again. This is because the sugar has been heated too much, too quickly, and instead of dissolving, it has cooked.

Begin beating the 50g egg whites with one hand, and with the other, stream the hot sugar syrup down the side of the bowl to create an italian meringue. Beat until stiff peaks form, the meringue should be thick and very glossy. If you want to add flavouring/colouring, now’s your moment. So add the cocoa now. Just lightly beat them into the meringue. Pour meringue into the almond meal, icing sugar and 45g egg whites mixture and mix roughly to combine. When combined, fold mixture together (one single stroke) until there are no air bubbles left. Make a spread across the top of the mixture, and it should disappear in about 20 seconds. Open your piping bag, and fold 1/4 of it down over itself. With a skewer or cake tester, spead 3 thick lines of orange colouring gel around the piping bag.

Colouring the piping bag

Let the swirls begin...

Spoon mixture into a piping bag fitted with a round nozzle. (If you don’t have a piping bag set, most supermarkets sell plastic ones, they are Multix brand, in an orange box and contain 5 piping bags with a few different nozzles, plus they’re only about $3. You should be able to find them in the baking aisle). Lock the bag by spinning the top around 4 times. Pipe 3-4cm rounds on the oven trays prepared earlier. Tap the bottom of the trays on the kitchen bench and let them sit for about half an hour, or until mixture is dry to the touch.

Swirly before...

Place in oven and bake for 8 minutes. Turn tray around in the oven and bake for another 7 minutes. To test, pull a macaron off the baking paper. If it is stuck, keep cooking and checking regularly. Cool on trays for 5 minutes, then peel off and place on a wire rack. The mixture should make about 12 -15 large macarons, and about 25 smaller macarons. Macarons keep really well (about 5 days in the fridge) and some say that the longer they are refrigerated, the more the flavour is likely to develop. Macarons taste best when they are stored in the fridge, then brought down to room temperature to eat.

Swirly after...

Jaffa Ganache:

  • 100g good quality dark chocolate, chopped
  • 1/2 cup thickened cream
  • Zest of 1 orange

Place chocolate, cream and zest in a medium saucepan. Cook over a medium heat until chocolate is melted. Place in a heatproof bowl and let it cool completely before refrigerating. If using that day, ensure ganache is firm enough to pipe. If not, ganache may need 5-10 seconds in the microwave before using.

To assemble, match up likely macaron shells. Place ganache in a piping bag fitted with a round nozzle, and pipe small rounds onto a shell. Sandwich with other shell.

The makings of ganache

Despite these macarons being one of the tastiest, they are also one of the easiest flavours to make! They are great for macaron beginners because you don’t need any complicated ingredients or equipment – the hardest part is probably melting the chocolate – easy 😉

Maple Bacon Macarons

My love of combining sweet and salty flavours is certainly well documented throughout this blog! Maple bacon is something I have wanted to try making for a while, but struggled about what I would do with it. So, I stuck to what I am best at, macarons.

I decided to use a cream cheese icing for the filling – it is definitely my favourite kind of icing, made even yummier with the addition of real maple syrup. The bacon, seriously, I could have happily eaten the whole tray (I know I say this with a lot of things!), but it was delicious – like a lolly with an awesome salt kick! Yum 🙂

I know there haven’t been as many posts as I would have liked in the past couple of months, but with Christmas coming up, there will probably be one nearly every day! I have just finished my Christmas baking list, and it’s safe to say I don’t think I will be leaving the kitchen for the month of December!

Macarons:

This recipe is Adriano Zumbo’s, and was published a couple of years ago in the Herald Sun. You will definitely need kitchen scales to make macarons.

  • 135g almond meal
  • 135g icing sugar
  • 125g caster sugar
  • 45g egg whites
  • 50g egg whites
  • 40g water

Preheat oven to 170c (160c fan forced). Spray four oven trays with cooking oil spray baround the edges, and line with baking paper and set aside. Place almond meal and icing sugar in a large bowl, and sift together 3 times. Set aside, along with the 45g egg whites. Put 50g egg whites in a separate bowl. Heat caster sugar and water in a small saucepan, over a low-medium heat, until the sugar completely dissolves (if it slightly burns my tongue, it’s done!). If you do not want to burn your tongue, Zumbo suggests investing in a candy thermometer and heating the syrup until it reaches 118 degrees C (244 degrees F). If the syrup becomes thick and powdery in appearance, you will need to start again. This is because the sugar has been heated too much, too quickly, and instead of dissolving, it has cooked.

Begin beating the 50g egg whites with one hand, and with the other, stream the hot sugar syrup down the side of the bowl to create an italian meringue. Beat until stiff peaks form, the meringue should be thick and very glossy. If you want to add flavouring/colouring, now’s your moment. Just lightly beat them into the meringue. Pour meringue into the almond meal, icing sugar and 45g egg whites mixture and mix roughly to combine. When combined, fold mixture together (one single stroke) until there are no air bubbles left. Make a spread across the top of the mixture, and it should disappear in about 20 seconds. Spoon mixture into a piping bag fitted with a round nozzle. (If you don’t have a piping bag set, most supermarkets sell plastic ones, they are Multix brand, in an orange box and contain 5 piping bags with a few different nozzles, plus they’re only about $3. You should be able to find them in the baking aisle). Lock the bag by spinning the top around 4 times. Pipe 3-4cm rounds on the oven trays prepared earlier. Tap the bottom of the trays on the kitchen bench and let them sit for about half an hour, or until mixture is dry to the touch.

Place in oven and bake for 8 minutes. Turn tray around in the oven and bake for another 7 minutes. To test, pull a macaron off the baking paper. If it is stuck, keep cooking and checking regularly. Cool on trays for 5 minutes, then peel off and place on a wire rack. The mixture should make about 12 -15 large macarons, and about 25 smaller macarons. Macarons keep really well (about 5 days in the fridge) and some say that the longer they are refrigerated, the more the flavour is likely to develop. Macarons taste best when they are stored in the fridge, then brought down to room temperature to eat.

Cream Cheese and Maple Syrup Icing: (adapted from Martha Stewart):

  • 112g unsalted butter, chopped and softened
  • 250g cream cheese (I used Philadelphia)
  • 1 cup icing sugar mixture
  • 80ml real maple syrup (I used Queen brand)

Beat the butter and cream cheese on high until pale and creamy. Gradually add the icing sugar and maple syrup. Refrigerate until firm enough to pipe.

Maple Candied Bacon: (adapted from Food Networks Claire Robinson):

  • 250g middle bacon, chopped into 1cm x 1cm pieces
  • 1/4 cup real maple syrup
  • 1/2 tsp wholegrain mustard (I know the recipe says to use dijon, but we didn’t have any and I love wholegrain mustard)

Line a baking tray with two layers of foil, and preheat the oven to 200c (395F). Spread the chopped bacon out on the tray, ensuring no pieces are overlapping. With a pastry brush, brush the bacon with the maple syrup and mustard mixture, ensuring each piece of bacon is evenly coated. Place in the preheated oven for 15 minutes, or until desired crispiness is achieved. You may have to turn some lighter pieces over at the 8 minutes mark. If so, brush with some more syrup. Let bacon cool for 5-10 minutes on the tray. Remove from tray and place in bowl. TIP – you do not want to let the candied bacon cool too much before you remove it from the foil, otherwise the foil will stick to the bacon and it will be really hard to get off. Leave about 25 squares of bacon, and finely chop up the rest so it will be small enough to put around the outside of the macaorn.Try not to eat it all at once 🙂 Trust me, it will be difficult!

Assembly:

Match up likely pairs of macaron shells. Fill a piping bag fitted with a round nozzle, with the maple cream cheese icing. Pipe small rounds of icing on the macaron shells, place a non-chopped piece of bacon on top, and pipe a tiny bit more icing on top of the bacon. Sandwich with the other macaron shell, and place a few finely chopped pieces of bacon around the outside of the macaron. Place macarons in an airtight container. As aforementioned, macarons are best when they are stored in the fridge, then brought down to room temperature to eat.

Anyone thinking of giving this delicious combination a try – do! It’s a perfect Christmas flavour as well, think Christmas hams basted in maple syrup!

Let the Christmas cooking begin!!

Spiderweb Macarons with Pumpkin Buttercream

As usual, I am behind with these babies, so Happy belated Halloween to you all! I can’t say I’ve ever really gone all out to celebrate Halloween, as it’s not huge here in Australia, but I’ll take any excuse to bake and make something a little left of centre 🙂 For so long, I have wanted to try making something sweet with pumpkin, so I thought Halloween would be the perfect occasion, coupled with some spooky spiderwebs!

These were originally meant to be Pumpkin Pie Macarons, and I was going to make the filling of the pie for the centre, and place a layer of shortcrust pastry in the middle. Although, surprise, surprise, I struggled with time, and I had trouble finding a recipe with no egg (as I wouldn’t cook the centre), that wouldn’t be too runny. So, I decided on a buttercream. I really like this buttercream, as the pumpkin is really subtle, and you get a hint of cinnamon too.

Macarons:

This recipe is Adriano Zumbo’s, and was published a couple of years ago in the Herald Sun. You will definitely need kitchen scales to make macarons.

  • 135g almond meal
  • 135g icing sugar
  • 125g caster sugar
  • 45g egg whites
  • 50g egg whites
  • 40g water
  • ¼ tsp Wilton’s colouring gel, orange

Preheat oven to 170c (160c fan forced). Spray four oven trays with cooking oil spray baround the edges, and line with baking paper and set aside. Place almond meal and icing sugar in a large bowl, and sift together 3 times. Set aside, along with the 45g egg whites. Put 50g egg whites in a separate bowl. Heat caster sugar and water in a small saucepan, over a low-medium heat, until the sugar completely dissolves (if it slightly burns my tongue, it’s done!). If you do not want to burn your tongue, Zumbo suggests investing in a candy thermometer and heating the syrup until it reaches 118 degrees C (244 degrees F). If the syrup becomes thick and powdery in appearance, you will need to start again. This is because the sugar has been heated too much, too quickly, and instead of dissolving, it has cooked.

Begin beating the 50g egg whites with one hand, and with the other, stream the hot sugar syrup down the side of the bowl to create an italian meringue. Beat until stiff peaks form, the meringue should be thick and very glossy. If you want to add flavouring/colouring, now’s your moment. So add the colouring now. Just lightly beat them into the meringue. Pour meringue into the almond meal, icing sugar and 45g egg whites mixture and mix roughly to combine. When combined, fold mixture together (one single stroke) until there are no air bubbles left. Make a spread across the top of the mixture, and it should disappear in about 20 seconds. Spoon mixture into a piping bag fitted with a round nozzle. (If you don’t have a piping bag set, most supermarkets sell plastic ones, they are Multix brand, in an orange box and contain 5 piping bags with a few different nozzles, plus they’re only about $3. You should be able to find them in the baking aisle). Lock the bag by spinning the top around 4 times. Pipe 3-4cm rounds on the oven trays prepared earlier. Tap the bottom of the trays on the kitchen bench and let them sit for about half an hour, or until mixture is dry to the touch.

Place in oven and bake for 8 minutes. Turn tray around in the oven and bake for another 7 minutes. To test, pull a macaron off the baking paper. If it is stuck, keep cooking and checking regularly. Cool on trays for 5 minutes, then peel off and place on a wire rack. The mixture should make about 12 -15 large macarons, and about 25 smaller macarons. Macarons keep really well (about 5 days in the fridge) and some say that the longer they are refrigerated, the more the flavour is likely to develop. Macarons taste best when they are stored in the fridge, then brought down to room temperature to eat.

Pumpkin Buttercream:

  • 215g butter, chopped and softened
  • 1 1/2 – 2 cups icing sugar mixture
  • 1 cup chopped pumpkin
  • 1/2 tsp cinnamon
  • 1/2 tsp salt

Place chopped pumpkin in a small saucepan with 1/4 cup water. Cook over a medium heat until pumpkin is soft enough to mash with a fork. In the meantime, beat the butter until it is pale and creamy, about 5 minutes. Gradually add the sugar to taste (I used about 1 1/2 cups, but taste as you go, depends on how sweet you like your buttercream). Add the salt and cinnamon. Gradually add the cooled, mashed pumpkin to the buttercream. My pumpkin was still a little lumpy, and I was going to put it through a sieve, but I thought tiny flecks of orange would look good through the buttercream.

Spiderweb Icing:

  • 4-5 tbs icing sugar mixture
  • 1/2 tsp Wilton’s colouring gel, black
  • Splash of water

Mix all ingredients in a small bowl until a thick paste is formed, and icing is completely black. You may need to add a little more colouring.

Assembly:

Pair up likely macaron shells. To pipe the spiderwebs, place the black icing in a piping bag fitted with a very thin, round nozzle. I stupidly forgot to take photos as I was piping the spiderwebs :/ If you would like to know how, this video is a good tutorial. The way the video shows you is a little different to mine, but it will achieve a fairly similar result 🙂 The black icing dries very quickly. FYI – you could also use melted chocolate to make spiderwebs as well. To pipe the buttercream, fill a piping bag fitted with a round nozzle. Pipe about 2/3 tsp of buttercream on each macaron shell, and sandwich with another.

Hope you all had a Happy horrifying, hair-raising Halloween! X

Parisian Red Velvet Cupcakes

Before I say anything else, I believe red velvet cupcakes are the world’s greatest invention. Ever. I. Love. Them. So. Much. I’m not sure exactly what it is, maybe the cream cheese frosting or the fact that the cake itself isn’t too sweet, or the combination of the two. Whatever it is, I love it!

It was my best friend’s birthday, and she loves all things Paris-y, so when I saw this kit with the cases and the little toothpicks, I knew exactly what I was going to use them for! I have tried a few red velvet recipes in my time, including the one for the giant cupcake, but I think this is the best one I have come across. It was delish-i-ohso.

Red Velvet Cupcakes: (by Martha Stewart):

  • 2 1/2 cups cake flour (if you don’t know what cake flour is, read this)
  • 2 tbs good-quality cocoa
  • 1 tsp salt
  • 1 1/2 cups caster sugar
  • 1 1/2 cups vegetable oil (yes, you read that right!)
  • 2 large eggs
  • 1/2 tsp Wilton’s red colouring gel
  • 1 tsp vanilla extract/vanilla bean paste
  • 1 cup buttermilk
  • 1 1/2 tsp baking soda
  • 2 tsp white vinegar

Preheat the oven to 175c (350F). Line two cupcake trays with cases. Place the flour, cocoa and salt together and mix, then set aside. With an electric whisk or a stand mixer, beat together the sugar and the oil until combined. Add eggs one at a time, beating until each is fully mixed in. Beat in vanilla and red food colouring gel.

Reduce the speed to low and add the flour mixture in 3 batches, and the buttermilk in 2 (3 dry, 2 wet additions – begin and end with dry). Whisk well after each addition. In a separate small bowl, combine the baking soda and vinegar – it will foam. Add mixture to the batter, and whisk all together for about 10 minutes. Fill each cupcake case about 3/4 of the way. Place in oven for 10 mins, then turn tray around and bake for another 10-12 minutes, or until a skewer comes out clean. Cool in tins for 5 mins, then transfer to wire rack. Makes approx. 22 large cupcakes.

Cream Cheese Icing:(also from Martha Stewart):

  • 225g unsalted butter, chopped and softened
  • 340g cream cheese (I used Philadelphia), softened slightly
  • 1 tsp vanilla extract/vanilla bean paste
  • 2-3 cups icing sugar mixture (confectioner’s sugar)

Beat the butter and cream cheese together until pale and creamy, about 2-3 minutes. Gradually add the icing sugar to taste, I used just over 2 cups, but you might want more if you like it sweeter – it’s really upto you 🙂 Beat in the vanilla.

Fill  piping bag fitted with a round nozzle and pipe a swirl on each cupcake. Decorate however you like!

I was originally a little worried about the amount of oil in this recipe, because you could really taste it in the batter before it was cooked. However, these cakes were so fluffy and moist – seriously one of the best I’ve ever tried. If you’re a fan of red velvet, definitely give these a go…you will not be disappointed 🙂

Have a great weekend and happy baking! X

Pink Champagne & Strawberry Layer Cake + Mini Cupcakes

I had always wondered what Pink Champagne would taste like in a dessert, as I had heard many stories and seen many recipes, but still wasn’t one hundred per cent convinced. As was it was my Nanna’s 81st Birthday coming up, I thought it would be the perfect time to try something Pink Champagney-cakey, because my Nanna lovvvvvvvvvvvvvvvvvvves Champagne, more than anyone else I know. I began my search for an inspiring recipe and stumbled across a Pink Champagne Cake Pop number from the ever-amazing Sweetapolita. I knew then I had to make it, because when it comes to cake, Sweetapolita is up there with the best and I knew it would be fantastic!

Unfortunately, when I made the cake I was running quite low on time (nothing ever changes!), and it wasn’t as pretty as I hoped it would be. So, it was definitely a rustic looking cake. The photos don’t do the cake justice either, I literally finished icing it and had to run out the door in my ten-inch heels, so the fact that the cake survived the journey to the restaurant is a miracle in itself! Lucky it did though, because it was really, really yummy. There was just enough booze to counteract the amount of butter and sugar in the icing, and the tang of the soaked strawberries in the middle certainly made it one delightful biteful!

My favourite part of the cake was definitely the Pink Champagne soaked strawberries in the middle. I cooked them down with some vanilla and a bit of sugar, and they were soooooo good! I could have happily eaten them all there and then.

Pink Champagne & Strawberry Layer Cake: (adapted from Sweetapolita)

  • 3 cups cake flour (if you don’t know what Cake Flour is – read this)
  • 1 ½ tsp baking powder
  • ¾ tsp baking soda
  • ¾ tsp salt
  • 170g butter, chopped and softened – not melted
  • 2 cups caster sugar
  • 6 egg whites
  • 1 tsp vanilla bean paste/vanilla extract
  • 2 cups Pink Champagne
  • 1 cup chopped strawberries

Preheat a fan forced oven to 175c (350F), and grease and line two 22cm spring form pans. Beat the butter and sugar together until pale and creamy, about 5 minutes. Sift the dry ingredients (flour, baking powder, baking soda and salt) together and set aside. To the butter and sugar mixture, gradually add the egg whites, followed by the vanilla. Add and alternate the dry ingredients and the champagne – make sure you begin and end with dry (3 dry, 2 wet). Stir in chopped strawberries. Mix until fully combined, but ensure you do not over mix. Evenly distribute the cake batter (use scales to ensure they are exact) into the two prepared tins. Place in preheated oven, and cook for 35 minutes, or until a skewer comes out clean. The cakes should spring back slightly when done. Do not open the oven until the cakes have been cooking for 25 minutes. Leave cakes in pan to cool for 10 minutes, then turn out onto a wire rack.

 Pink Champagne Buttercream: (this can be made a few days in advance and stored in the fridge)

  • 350g salted butter, chopped and softened, not melted
  • 2 cups icing sugar mixture
  • 1/3 cup Pink Champagne
  • ½ tsp vanilla bean paste/vanilla extract

Beat butter until pale and fluffy, about 5 minutes. Add the vanilla. Gradually add the Pink Champagne and sugar. After buttercream is fully incorporated, beat for another 5-8 minutes.

Pink Champagne soaked Strawberries:

  • 1 small punnet strawberries, roughly chopped
  • 1/3 cup Pink Champagne
  • 1 tsp vanilla bean paste/vanilla extract
  • 3 tsp caster sugar

Place all ingredients in a small bowl and leave to soak for up to an hour (you could leave it longer if you wanted to). Pour ingredients into a small saucepan and cook over a medium heat until mixture is boiling. When it starts to boil, turn the heat down to low and simmer for 45 minutes, or until mixture is thick and syrupy. Let strawberries cool before you put them on the cake.

Assembly:

Place one layer of cake on a stand or board, or whatever you’re using. Spread a very thin layer of buttercream over the first cake, and evenly pour the soaked strawberries, and sandwich with the second layer of cake. Cover the entire cake with a layer of buttercream, using a round edged knife. I find the easiest way to do this is to get a cup of warm water, and to regularly dip – it just goes on smoother and won’t break the cake. Top the cake with a handful of strawberries for decoration and freshness 😉

I also made some mini cupcakes with the leftover Pink Champagne buttercream I had. I managed to get some better photos of these ones…

I used the foolproof recipe I always use for Vanilla Cupcakes, they work perfectly every time and are so easy!


M&M Cookie Dough Macarons

Ever since I’d laid eyes on this cookie dough buttercream recipe from Raspberri Cupcakes and Annie’s Eats, I’ve wanted to make something a little out of the ordinary with it and I’ve had quite a few ideas. Due to of the colour of the buttercream, I really wanted to make something super bright. I thought a bright blue macaron shell and M&M’s would do the trick. So, here we are.

Often when I make bright macaron shells, the colour can bake out a little, but these babies stayed nice and blue, albeit a slight green tinge. It worked really well though, because of all the different colours of the M&Ms.

I used my usual macaron shell recipe, and added about half a teaspoon of Wilton’s colouring gel. I was careful not to go too crazy with the colouring – I wanted to avoid what happened with the Salt and Vinegar Macarons. As the blue gel is so concentrated, it was perfect 🙂

I lovvvvvvvvvvved the cookie dough buttercream! It is really easy to make, is so versatile (can’t wait to make cookie dough cupcakes!), and it doesn’t have scary raw egg (which is a bonus for me because I’m allergic!).

I totally recommend making this buttercream, because it is sooo easy! The list is endless with what you can make (think filled cupcakes, cookie sandwiches, layer cakes or even ice cream – or just eat it out of the bowl?), and you can a million types of chocolate and/or lollies 🙂 Yum!

Excuse the small post, but stay tuned for a nice big one for next week! 🙂

Raspberry Buttercream Macarons

My love for raspberry is certainly well documented, and this addition is no exception!

I thought it would be nice to do something non chocolate or caramel for a change! I made a simple buttercream, and just added some raspberries that I cooked down and it worked really well. The flavour was great and I love the natural pink colour it gives. I also put half a raspberry in the middle of each macaron because I thought it would break up the buttercream and add a nice tang 😉

Macarons:

This recipe is Adriano Zumbo’s, and was published a couple of years ago in the Herald Sun. You will definitely need kitchen scales to make macarons.

  • 135g almond meal
  • 135g icing sugar
  • 125g caster sugar
  • 45g egg whites
  • 50g egg whites
  • 40g water
  • 1/4 tsp Wilton’s pink colouring gel

Preheat oven to 170c (160c fan forced). Spray four oven trays with cooking oil spray baround the edges, and line with baking paper and set aside. Place almond meal and icing sugar in a large bowl, and sift together 3 times. Set aside, along with the 45g egg whites. Put 50g egg whites in a separate bowl. Heat caster sugar and water in a small saucepan, over a low-medium heat, until the sugar completely dissolves (if it slightly burns my tongue, it’s done!). If you do not want to burn your tongue, Zumbo suggests investing in a candy thermometer and heating the syrup until it reaches 118 degrees C (244 degrees F). If the syrup becomes thick and powdery in appearance, you will need to start again. This is because the sugar has been heated too much, too quickly, and instead of dissolving, it has cooked.

Begin beating the 50g egg whites with one hand, and with the other, stream the hot sugar syrup down the side of the bowl to create an italian meringue. Beat until stiff peaks form, the meringue should be thick and very glossy. If you want to add flavouring/colouring, now’s your moment. So add the colouring now. Just lightly beat them into the meringue. Pour meringue into the almond meal, icing sugar and 45g egg whites mixture and mix roughly to combine. When combined, fold mixture together (one single stroke) until there are no air bubbles left. Make a spread across the top of the mixture, and it should disappear in about 20 seconds. Spoon mixture into a piping bag fitted with a round nozzle. (If you don’t have a piping bag set, most supermarkets sell plastic ones, they are Multix brand, in an orange box and contain 5 piping bags with a few different nozzles, plus they’re only about $3. You should be able to find them in the baking aisle). Lock the bag by spinning the top around 4 times. Pipe 3-4cm rounds on the oven trays prepared earlier. Tap the bottom of the trays on the kitchen bench and let them sit for about half an hour, or until mixture is dry to the touch.

Place in oven and bake for 8 minutes. Turn tray around in the oven and bake for another 7 minutes. To test, pull a macaron off the baking paper. If it is stuck, keep cooking and checking regularly. Cool on trays for 5 minutes, then peel off and place on a wire rack. The mixture should make about 12 -15 large macarons, and about 25 smaller macarons. Macarons keep really well (about 5 days in the fridge) and some say that the longer they are refrigerated, the more the flavour is likely to develop. Macarons taste best when they are stored in the fridge, then brought down to room temperature to eat.


Raspberry Buttercream:

  • 2/3 cup raspberries, fresh or frozen
  • 175g butter, chopped and softened
  • 1 1/4 cups icing sugar mixture

Place raspberries in medium saucepan with a splash of water. Cook over a low heat for about 10 minutes until raspberries are cooked down enough to pass through a sieve. Push raspberries through a fine sieve to get rid of the seeds. Let mixture cool completely.

Beat butter on high until pale and creamy. Gradually add the icing sugar and raspberry mixture. If not using immediately, refrigerate.

Assembly:

Match likely pairs of macaron shells. Fill a piping bag fitted with a star nozzle, and pipe a small round on a shell. With the left over raspberries, cut each berry in half and place on top of the buttercream. Pipe another small swirl on top, and sandwich with the other shell.

These macarons are also a part of this month’s Mactweets Challenge which are showcasing seasonal fruit. Seeing as raspberries are one of my favourite fruits and they are slowly coming into season in Australia, I thought they would be my best bet!

Mars Bar Macarons

I’ve had the idea of doing something Mars Bar-sy lately, whether it was a macaron, ice cream or cupcakes (which hopefully I will get around to eventually!). I decided on the red shell because of how the colour the word ‘Mars’ appears on the packet, and I thought it would stand out more than a plain chocolate coloured shell!

I used both salted caramel and chocolate ganache for the filling and it is safe to say they were pretty yummy! Maybe next time I’ll try to make a bit of a nougat to stick in there as well.

Macarons:

This recipe is Adriano Zumbo’s, and was published a couple of years ago in the Herald Sun. You will definitely need kitchen scales to make macarons.

  • 135g almond meal
  • 135g icing sugar
  • 125g caster sugar
  • 45g egg whites
  • 50g egg whites
  • 40g water
  • ¾ tsp Wilton’s colouring gel in red (I used ‘Rojo Intenso)

Preheat oven to 170c (160c fan forced). Spray four oven trays with cooking oil spray around the edges, and line with baking paper and set aside. Place almond meal and icing sugar in a large bowl, and sift together 3 times. Set aside, along with the 45g egg whites. Put 50g egg whites in a separate bowl. Heat caster sugar and water in a small saucepan, over a low-medium heat, until the sugar completely dissolves (if it slightly burns my tongue, it’s done!). If you do not want to burn your tongue, Zumbo suggests investing in a candy thermometer and heating the syrup until it reaches 118 degrees C (244 degrees F). If the syrup becomes thick and powdery in appearance, you will need to start again. This is because the sugar has been heated too much, too quickly, and instead of dissolving, it has cooked.

Begin beating the 50g egg whites with one hand, and with the other, stream the hot sugar syrup down the side of the bowl to create an italian meringue. Beat until stiff peaks form, the meringue should be thick and very glossy. If you want to add flavouring/colouring, now’s your moment. So add the colouring in now. Just lightly beat them into the meringue. Pour meringue into the almond meal, icing sugar and 45g egg whites mixture and mix roughly to combine. When combined, fold mixture together (one single stroke) until there are no air bubbles left. Make a spread across the top of the mixture, and it should disappear in about 20 seconds. Spoon mixture into a piping bag fitted with a round nozzle. (If you don’t have a piping bag set, most supermarkets sell plastic ones, they are Multix brand, in an orange box and contain 5 piping bags with a few different nozzles, plus they’re only about $3. You should be able to find them in the baking aisle). Lock the bag by spinning the top around 4 times. Pipe 3-4cm rounds on the oven trays prepared earlier. Tap the bottom of the trays on the kitchen bench and let them sit for about half an hour, or until mixture is dry to the touch.

Place in oven and bake for 7 minutes. Turn tray around in the oven and bake for another 7 minutes. To test, pull a macaron off the baking paper. If it is stuck, keep cooking and checking regularly. Cool on trays for 5 minutes, then peel off and place on a wire rack. The mixture should make about 12 -15 large macarons, and about 25 smaller macarons. Macarons keep really well (about 5 days in the fridge) and some say that the longer they are refrigerated, the more the flavour is likely to develop. Macarons taste best when they are stored in the fridge, then brought down to room temperature to eat.


For the salted caramel, I used Zumbo’s recipe that I have used before for the Salted Butter Caramel Macarons – it does take a while to make but it is to die for! I also used my usual recipe for chocolate ganache:

Chocolate Ganache:

  • 100g chocolate, chopped
  • 1/2 cup cream (doesn’t really matter which type but I use thickened or lite thickened)

Place chocolate and cream in a saucepan over a low-medium heat. Constantly stir with a metal spoon until completely melted. Pour into container/bowl/whatever and refrigerate until firm enough to pipe. I often make this ganache the day before and take it out of the fridge in the morning. Sometimes it may need 5-10 seconds in the microwave.

Assembly:

Like the above picture, place salted caramel and chocolate ganache in separate piping bags fitted with round nozzle. Pipe a circle of ganache on a shell, and fill the hole with salted caramel (it doesn’t really matter what order you do this in). Sandwich with other shell.

Yummmmmmmmmmm!