
Trust me to make macarons more difficult than they already are! I didn’t think the choc dip component of these special delights would be that tricky, but they turned out to be quite fiddly, and very messy. It was worth it though, as they were quite delicious. It’s been forever since I have made anything remotely coffee, and I tend to forget how yummy coffee flavoured desserts and sweets can be. This flavour went down really well with my family and colleagues, and even my boyfriend who loathes coffee quite enjoyed it, too. Winner! Also, apologies for the photos. I’ve been having issues with my good camera, so my iPhone had to do the job this time around.

The filling was super easy to make. It’s a basic buttercream with a bit of coffee thrown in. You just have to make sure to get the balance just right – not too much coffee, not too little. The flavour worked really well with the salted butter, and the dark chocolate dip. Even though it was messy, I’d totally do the choc dip again. It makes them just that little bit extra indulgent – perfect in the throes of Winter!
Macarons:
This recipe is Adriano Zumbo’s, and was published a couple of years ago in the Herald Sun. You will definitely need kitchen scales to make macarons.
- 135g almond meal
- 135g icing sugar
- 125g caster sugar
- 45g egg whites
- 50g egg whites
- 40g water
Spray four oven trays with cooking oil spray around the edges, and line with baking paper and set aside. Place almond meal and icing sugar in a large bowl, and sift together 3 times. Set aside, along with the 45g egg whites. Put 50g egg whites in a separate bowl. Heat caster sugar and water in a small saucepan, over a low-medium heat, until the sugar completely dissolves (if it slightly burns my tongue, it’s done!). If you do not want to burn your tongue, Zumbo suggests investing in a candy thermometer and heating the syrup until it reaches 118 degrees C (244 degrees F). If the syrup becomes thick and powdery in appearance, you will need to start again. This is because the sugar has been heated too much, too quickly, and instead of dissolving, it has cooked.
Begin beating the 50g egg whites with one hand, and with the other, stream the hot sugar syrup down the side of the bowl to create an italian meringue. Beat until stiff peaks form, the meringue should be thick and very glossy. Pour meringue into the almond meal, icing sugar and 45g egg whites mixture and mix roughly to combine. When combined, fold mixture together (one single stroke) until there are no air bubbles left. Make a spread across the top of the mixture, and it should disappear in about 20 seconds. Spoon mixture into a piping bag fitted with a round nozzle. If you don’t have a piping set, most supermarkets sell plastic disposable ones with a few different nozzles. You should be able to find them in the baking aisle. Lock the bag by spinning the top around 4 times. Pipe 3-4cm rounds on the oven trays prepared earlier. Tap the bottom of the trays on the kitchen bench and let them sit for about half an hour, or until mixture is dry to the touch. Don’t rush this process – you want the shells to be completely dry. Otherwise, it is unlikely that the ‘foot’ of the macaron will be formed. Preheat your oven to 125c or 135c, fan forced.

Place in oven and bake for 8 minutes. Turn trays around, and bake for another 9 minutes. To check if shells are cooked, gently lift one off the baking paper. If it peels of easily, they are done, if not, keep checking at 2 minute intervals. Furthermore, if you notice the tops have a slightly crumpled look after you take them out of the oven, put them back in for another couple of minutes. In my experience, this means that they are slightly undercooked and/or haven’t dried out enough before cooking. Cool on trays for 5 minutes, then peel off and place on a wire rack. The mixture should make about 12 -15 large macarons, and about 25 smaller macarons. Macarons keep really well (about 5 days in the fridge) and some say that the longer they are refrigerated, the more the flavour is likely to develop. Macarons taste best when they are stored in the fridge, then brought down to room temperature to eat.
Cappuccino Buttercream:
- 200g salted butter, chopped and softened
- Approx. 1 cup icing (confectioner’s) sugar
- 1 tsp vanilla bean paste
- Approx. 30ml espresso (you can use coffee bags or instant powdered/granule coffee as well, just make sure it’s not too watered down)
Beat butter until pale and creamy. Add vanilla bean paste and beat until combined. Gradually add sugar and coffee to butter mixture. Please be careful with adding the coffee, as you don’t want to add too much liquid at once, otherwise the butter may split and curdle. Add it slowly and keep tasting until happy with the strength and flavour.
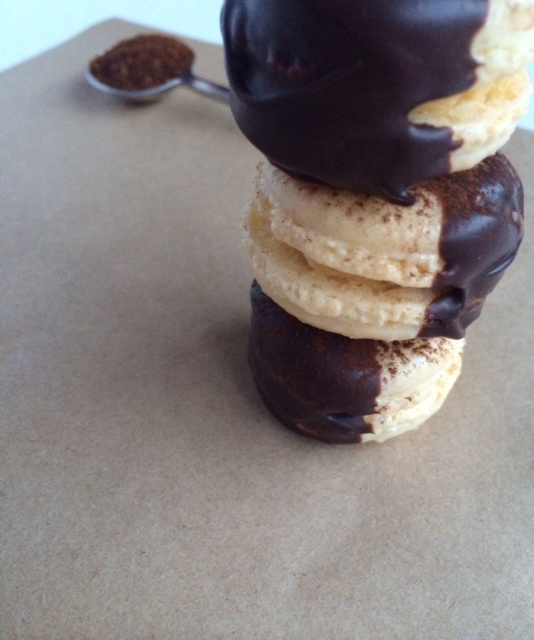
For the choc dip, melt good quality dark chocolate in a small glass bowl/ramekin. Don’t use anything too deep because it will make it harder to dip the macaron in and out of the chocolate. I melted the chocolate gradually, as I needed it, as I didn’t want it to harden, because the dipping process did take a while. Overall, I ended up using about 200g of melts (small chocolate bits). Melt chocolate in 20 second increments in the microwave, and use a metal spoon to stir. Melting the chocolate in short increments will keep it from burning and turning into that horrible lumpy, grainy consistency. Once chocolate is smooth and glossy, gently dip each macaron half way into the chocolate, using a teaspoon to remove the excess, and place on an oven tray lined with a fresh sheet of baking paper. Once chocolate has hardened, dust macarons with cocoa. Place in an airtight container in the refrigerator, and bring to room temperature to eat.

Whilst the weather here in Melbourne is pretty horrible at the moment, like, ice-all-over-your-car-in-the-morning kind of horrible (Aussie’s are not used to this!), the upside is that it’s perfect macaron making weather! No humidity, no air conditioning. Take advantage of it if you can!
Have a great weekend, and Happy Baking! 🙂
